The first time I made black velvet cupcakes, I was convinced the color was a gimmick. Honestly, I thought any cake that looked that dark had to taste like a chemistry experiment. It was for a Halloween party, and I needed something dramatic, but I refused to serve something that sacrificed flavor for a spooky look. So I tweaked a classic red velvet recipe, swapped the cocoa ratio, and added a touch more buttermilk to keep the crumb tender. The result? A cupcake so moist and rich that the black color almost felt like a bonus. It was the first thing to disappear from the dessert table, and I spent the rest of the night convincing people it was just a really good chocolate cake. That is how these Best Black Velvet Halloween Cupcakes with Oreo Spiders were born—not from a desire to be trendy, but from a stubborn need to prove that a gothic-looking dessert could be genuinely delicious. And honestly, it worked.
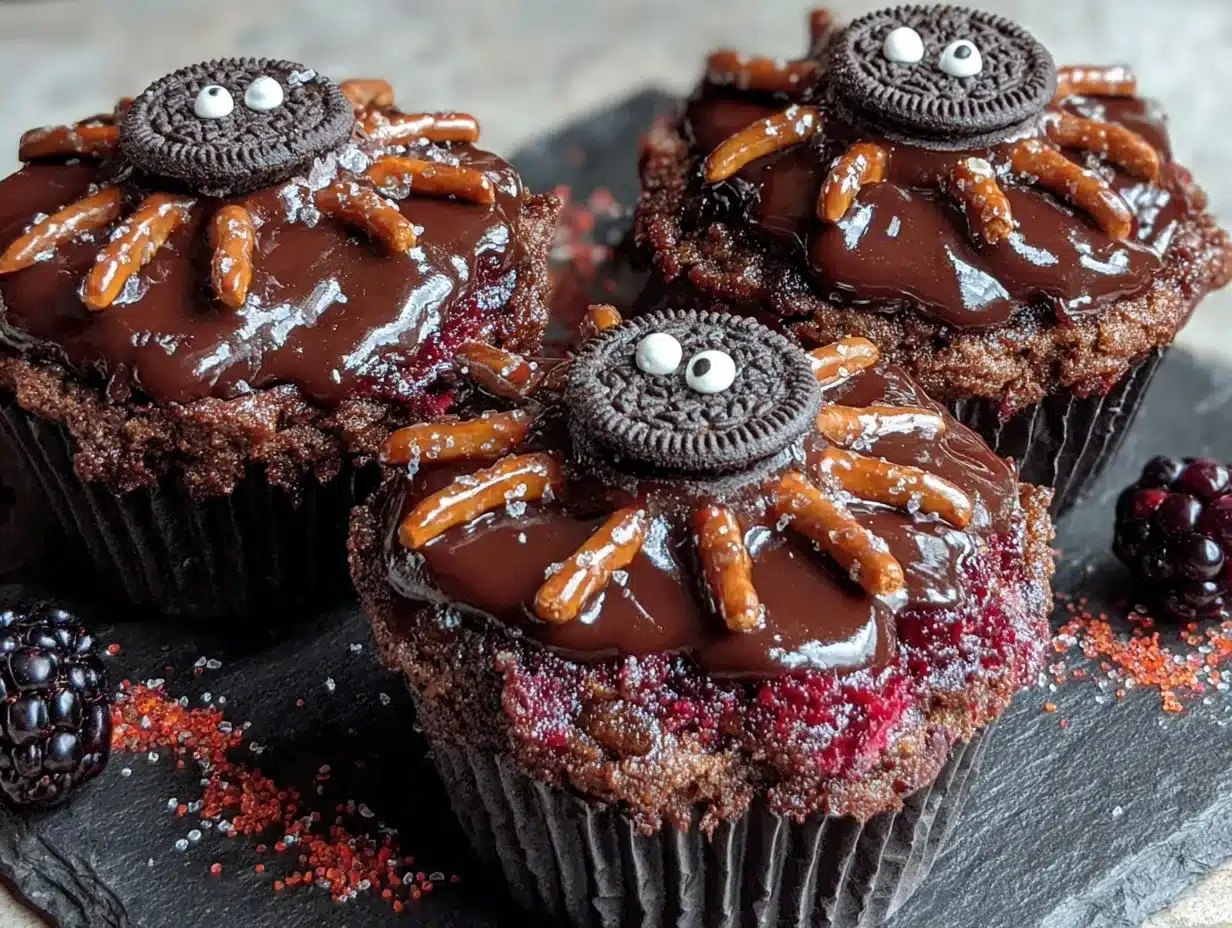
These cupcakes are the perfect balance of visual drama and real, satisfying flavor. The deep black crumb is impossibly tender, with a subtle tang from the buttermilk and a rich, dark cocoa finish. It is the kind of cake that makes you take a second look, then a second bite. The real showstopper, though, is the Oreo spider perched on top of a swirl of creamy, tangy cream cheese frosting. It is a fun, edible decoration that turns a simple cupcake into a conversation piece. I have made these for Halloween parties, spooky movie nights, and even a themed birthday, and they always get the same reaction—a mix of delight and disbelief that something so dark can taste so good.
If you have ever been let down by a Halloween dessert that looked amazing but tasted like cardboard, this recipe is for you. It is a reminder that holiday treats can be both festive and genuinely delicious. So, let us get started. I promise, these cupcakes are worth the extra effort, and the Oreo spiders are way easier to make than you think.
Why You’ll Love This Recipe
I have tested this recipe more times than I care to admit, and each batch taught me something new. The first time, the cupcakes came out too dry. The second time, the color was more gray than black. But by the third try, I had it dialed in. This version is the result of all those trials, and it is the one I make every single Halloween. It is not just another spooky dessert—it is a genuinely great cupcake that happens to look like it came from a haunted bakery.
- Quick & Easy: From start to finish, these cupcakes come together in about 45 minutes. The batter is a one-bowl wonder, and the Oreo spiders take only a few minutes to assemble. Perfect for last-minute Halloween planning.
- Simple Ingredients: You likely have most of the ingredients in your pantry already. The only special item is black gel food coloring, which is easy to find at any grocery store or online. No fancy extracts or hard-to-find flours here.
- Perfect for Halloween: These cupcakes are the star of any Halloween party, spooky bake sale, or movie night. They are dramatic enough for adults and fun enough for kids. Plus, the Oreo spiders are a hit with everyone.
- Crowd-Pleaser: I have served these to kids, adults, and even a few self-proclaimed “not a cake person” types. Every single person has gone back for a second. The combination of tender black velvet cake and tangy cream cheese frosting is universally loved.
- Unbelievably Delicious: The secret is in the balance. The black cocoa powder gives a deep, almost Oreo-like flavor, while the buttermilk keeps the crumb incredibly moist. It is not a gimmick—it is a genuinely good cake that happens to be black.
This recipe is different from other Halloween cupcakes because it prioritizes flavor first. I have seen too many recipes that rely on artificial coloring and end up tasting like paste. This one uses a high-quality black cocoa powder and a tested ratio of wet to dry ingredients to ensure a tender, flavorful crumb every time. It is the kind of cupcake that makes you close your eyes after the first bite, even if you are wearing a witch hat. It is comfort food reimagined for the spookiest night of the year—faster, more dramatic, but with the same soul-soothing satisfaction.
What Ingredients You Will Need
This recipe uses simple, pantry-friendly ingredients to deliver a rich, moist, and deeply colored cupcake. The magic is in the combination of black cocoa powder and a touch of buttermilk, which creates a tender crumb and a flavor that is reminiscent of an Oreo cookie. Here is everything you need:
For the Cupcakes
- All-purpose flour: 1 ½ cups (180g). Provides structure. Spoon and level it for accuracy.
- Black cocoa powder: ½ cup (45g). This is the key to the deep color and rich flavor. I prefer the Rodelle brand for its intense color and smooth taste. Regular Dutch-process cocoa will work, but the color will be a dark brown, not black.
- Granulated sugar: 1 cup (200g). Adds sweetness and helps with browning.
- Baking soda: 1 teaspoon. Helps the cupcakes rise.
- Salt: ½ teaspoon. Balances the sweetness and enhances the chocolate flavor.
- Buttermilk: ¾ cup (180ml), room temperature. Adds tanginess and moisture. If you don’t have buttermilk, you can make a quick substitute by adding 1 tablespoon of lemon juice or white vinegar to ¾ cup of milk and letting it sit for 5 minutes.
- Vegetable oil: ½ cup (120ml). Keeps the cupcakes moist. Use a neutral-flavored oil like canola or grapeseed.
- Large eggs: 2, room temperature. Provide structure and richness.
- Vanilla extract: 2 teaspoons. Enhances the chocolate flavor.
- Black gel food coloring: 1-2 teaspoons. This is essential for achieving that true black color. Liquid food coloring won’t cut it. I use the Americolor brand for the best results.
- White vinegar: 1 teaspoon. Reacts with the baking soda to help the cupcakes rise and creates a tender crumb.
For the Cream Cheese Frosting
- Cream cheese: 8 oz (226g), softened. Use full-fat for the best flavor and texture.
- Unsalted butter: ½ cup (113g), softened. Adds stability and richness.
- Powdered sugar: 3-4 cups (360-480g), sifted. Adjust the amount to reach your desired consistency.
- Vanilla extract: 1 teaspoon.
- Pinch of salt: To balance the sweetness.
For the Oreo Spiders (Decoration)
- Oreo cookies: 12 whole cookies. These will be the spider bodies.
- Chocolate-covered pretzel sticks: 48 pieces (4 per spider). These are the spider legs. You can also use regular pretzel sticks, but the chocolate-covered ones add a nice touch.
- Candy eyes: 24 small edible eyes. You can find these at any craft store or online.
- Black or white frosting: A small amount, to attach the eyes and legs. A tube of store-bought writing gel works perfectly.
For the best texture, make sure your eggs and buttermilk are at room temperature. This helps them emulsify into the batter, resulting in a more tender crumb. If you are in a pinch, you can warm the buttermilk in the microwave for 10-15 seconds and place the eggs in a bowl of warm water for 5 minutes.
Equipment Needed
You do not need a lot of fancy equipment to make these cupcakes, but a few key tools will make the process much smoother. Here is what I recommend:
- Muffin tin: A standard 12-cup muffin tin. I prefer a non-stick one for easy release.
- Paper liners: Use black or orange liners for a festive look. I like the ones from Wilton—they are sturdy and don’t stick to the cake.
- Mixing bowls: One large bowl for the dry ingredients and another for the wet. Glass or stainless steel works best.
- Whisk: For combining the dry ingredients and for mixing the batter.
- Electric mixer: A hand mixer or stand mixer with a paddle attachment is ideal for the frosting. You can do it by hand, but your arm will get a workout.
- Piping bag and tip: A large piping bag fitted with a star tip (like a 1M) for the frosting. If you don’t have a piping bag, you can use a zip-top bag with the corner snipped off.
- Cooling rack: Essential for cooling the cupcakes evenly and preventing soggy bottoms.
- Small offset spatula: Helpful for smoothing the frosting, though not strictly necessary.
If you do not have a piping bag, do not worry. You can simply spread the frosting with a knife. The cupcakes will still look beautiful, and the Oreo spiders will do all the heavy lifting in the decoration department. I have made these cupcakes with a cheap hand mixer and a plastic piping bag, and they turned out just as good as when I use my professional equipment.
Preparation Method
Let us get baking. This recipe is straightforward, but there are a few key steps to ensure the perfect black velvet crumb. Follow along, and you will have a batch of spooky, delicious cupcakes in no time.
Step 1: Preheat and Prepare
Preheat your oven to 350°F (175°C). Line your muffin tin with 12 paper liners. This is a non-negotiable step—the liners make for easy removal and a clean presentation. Set the tin aside.
Step 2: Mix the Dry Ingredients
In a large mixing bowl, whisk together the all-purpose flour, black cocoa powder, granulated sugar, baking soda, and salt. Make sure there are no lumps in the cocoa powder. If there are, sift the dry ingredients through a fine-mesh sieve. This is especially important with black cocoa powder, which can be clumpy.
Step 3: Combine the Wet Ingredients
In a separate bowl or a large liquid measuring cup, whisk together the buttermilk, vegetable oil, eggs, vanilla extract, and black gel food coloring. The mixture will look a bit strange at this point—a dark, almost grayish liquid. Do not worry; it will come together once combined with the dry ingredients. Add the white vinegar and give it one last whisk.
Step 4: Combine Wet and Dry
Pour the wet ingredients into the bowl with the dry ingredients. Use a spatula or a whisk to gently fold the mixture together until just combined. Do not overmix. A few small lumps are fine. Overmixing will develop the gluten and result in tough, dense cupcakes. The batter will be thin and slightly runny—that is exactly what you want.
Step 5: Fill the Liners
Divide the batter evenly among the 12 prepared liners. I like to use a cookie scoop or a ¼-cup measure for even portions. Fill each liner about ⅔ full. This will give you perfectly domed cupcakes without overflowing.
Step 6: Bake
Bake for 18-22 minutes, or until a toothpick inserted into the center of a cupcake comes out clean or with a few moist crumbs. The tops should spring back when lightly touched. My oven runs hot, so I start checking at 18 minutes. Rotate the pan halfway through baking for even results.
Step 7: Cool Completely
Let the cupcakes cool in the pan for 5 minutes. Then, carefully transfer them to a wire cooling rack to cool completely. This is crucial—if you frost them while they are still warm, the frosting will melt and slide right off. Patience is a virtue, especially when it comes to cream cheese frosting.
Step 8: Make the Frosting
While the cupcakes are cooling, make the cream cheese frosting. In a large bowl, beat the softened cream cheese and butter together with an electric mixer until smooth and creamy, about 2 minutes. Add the vanilla extract and a pinch of salt, and beat to combine. Gradually add the sifted powdered sugar, one cup at a time, beating on low speed until incorporated. Once all the sugar is added, increase the speed to medium-high and beat for 2-3 minutes until the frosting is light, fluffy, and spreadable.
Step 9: Assemble the Oreo Spiders
This is the fun part. Take each whole Oreo cookie and carefully twist it apart. You want one half with the cream filling and one half without. For the spider body, use the half with the cream filling. Take 4 chocolate-covered pretzel sticks and gently press them into the cream filling on each side of the Oreo, so they look like spider legs. You may need to use a small dab of frosting to help them stick. Then, use a tiny dot of frosting to attach two candy eyes to the top of the Oreo. Repeat for all 12 spiders.
Step 10: Frost and Decorate
Once the cupcakes are completely cool, frost them. You can use a piping bag fitted with a star tip to create a swirl, or simply spread the frosting with a knife. Place one Oreo spider on top of each frosted cupcake, pressing down gently so it stays in place. The spiders should look like they are crawling across a creamy, spooky landscape.
Your sensory cues: The batter will be a dark, inky black and smell faintly of chocolate and vinegar. The baked cupcakes will have a rich, chocolatey aroma and a tender, velvety crumb. The frosting should be thick, smooth, and tangy. The finished cupcakes are a sight to behold—dark, dramatic, and undeniably Halloween.
Cooking Tips & Techniques
I have made a lot of mistakes in the kitchen, and I am happy to share them so you do not have to. Here are the tips I have learned from my many batches of black velvet cupcakes:
- Do not skip the black cocoa powder. Regular cocoa powder will give you a dark brown cupcake, not a black one. Black cocoa powder is the secret to that dramatic, Oreo-like color and flavor. It is worth the extra trip to the store or the online order.
- Use gel food coloring, not liquid. Liquid food coloring will thin out your batter and result in a gray, not black, color. Gel food coloring is concentrated and will give you a true black without altering the texture. I have made the mistake of using liquid coloring, and the cupcakes turned out a sad, muddy gray.
- Room temperature ingredients are not optional. Cold eggs and buttermilk will not emulsify properly, leading to a dense, uneven crumb. Take them out of the refrigerator at least 30 minutes before you start baking. I usually set them on the counter while I gather my other ingredients.
- Do not overmix the batter. This is the number one mistake I see with velvet cakes. Mix until the flour is just incorporated. A few lumps are perfectly fine. Overmixing develops the gluten and makes the cupcakes tough.
- Let the cupcakes cool completely before frosting. I know it is tempting to rush, but warm cupcakes will turn your beautiful cream cheese frosting into a melty mess. I usually make the cupcakes the day before and frost them the next day. It saves time and ensures perfect results.
- Make the Oreo spiders ahead of time. You can assemble the spiders a day or two in advance and store them in an airtight container at room temperature. This makes assembly on the day of your party a breeze.
One of my biggest failures was the time I tried to speed up the cooling process by putting the cupcakes in the refrigerator. The moisture from the fridge made the tops sticky and the texture slightly gummy. Now, I always cool them on a wire rack at room temperature, and the results are consistently perfect.
Variations & Adaptations
These cupcakes are incredibly versatile. I have experimented with several variations over the years, and here are my favorites:
- Gluten-Free Option: Substitute the all-purpose flour with a 1:1 gluten-free baking flour blend. I have used King Arthur Measure for Measure with great success. Make sure the blend contains xanthan gum for structure. The texture will be slightly more delicate, but still delicious.
- Dairy-Free Option: Use a dairy-free cream cheese alternative (like Kite Hill) and a plant-based butter for the frosting. For the cupcakes, substitute the buttermilk with a mixture of ¾ cup unsweetened almond milk and 1 tablespoon of lemon juice. Let it sit for 5 minutes before using.
- Spider-Free Decoration: If you are not a fan of the Oreo spiders (or if you are short on time), you can simply top the frosted cupcakes with a sprinkle of black sanding sugar or a few chocolate shavings. For an even simpler look, pipe a small ghost shape using white frosting and a dot of black gel for the eyes.
- Peppermint Twist: Add ½ teaspoon of peppermint extract to the cupcake batter along with the vanilla extract. It gives the cupcakes a subtle, refreshing minty flavor that pairs beautifully with the dark chocolate. Top with a crushed candy cane for a festive touch.
- Spicy Chocolate: Add ¼ teaspoon of cayenne pepper and ½ teaspoon of cinnamon to the dry ingredients. The heat from the cayenne complements the rich chocolate flavor and adds a surprising kick that is perfect for a Halloween party.
I once tried a version with a raspberry filling, and it was incredible. I simply used a small knife to cut a cone out of the center of each baked cupcake, filled it with a spoonful of raspberry jam, and replaced the top before frosting. The tartness of the raspberry cut through the richness of the chocolate and frosting perfectly. It is a bit more work, but so worth it for a special occasion.
Serving & Storage Suggestions
These cupcakes are best served at room temperature. The cream cheese frosting softens slightly, and the cake crumb is at its most tender. If you have stored them in the refrigerator, let them sit on the counter for about 30 minutes before serving.
For presentation, I like to arrange them on a black or dark purple cake stand. The contrast between the dark cupcakes and the stand is striking. You can also place them on a platter with a few fake spider webs and plastic spiders for a truly spooky effect. I once served them on a platter lined with black and orange tissue paper, and it looked fantastic.
These cupcakes pair beautifully with a glass of cold milk, a hot cup of coffee, or a pumpkin spice latte. For a Halloween party, consider serving them alongside a batch of sparkling citrus ginger mojito mocktails for a non-alcoholic option that is just as festive.
Storage: Store the unfrosted cupcakes in an airtight container at room temperature for up to 2 days. Once frosted, they should be stored in the refrigerator in an airtight container for up to 4 days. The Oreo spiders can be stored separately in an airtight container at room temperature for up to a week.
Freezing: You can freeze the unfrosted cupcakes for up to 3 months. Wrap each one tightly in plastic wrap, then place them in a freezer-safe bag. Thaw at room temperature before frosting. I do not recommend freezing the frosted cupcakes, as the cream cheese frosting can become grainy when thawed.
Reheating: If you prefer a warm cupcake, you can microwave an unfrosted cupcake for 10-15 seconds. Do not microwave the frosted cupcakes, as the frosting will melt. The flavors actually develop and deepen over time, so these cupcakes taste even better the day after they are baked.
Nutritional Information & Benefits
While these are a treat and not a health food, I believe in knowing what is in my food. Here is the estimated nutritional information for one cupcake (with frosting and decoration):
| Nutrient | Amount per Serving |
|---|---|
| Calories | 420 |
| Fat | 22g |
| Saturated Fat | 10g |
| Carbohydrates | 54g |
| Sugar | 38g |
| Protein | 5g |
| Sodium | 280mg |
These values are estimates and will vary based on the specific ingredients you use.
On the plus side, black cocoa powder is a good source of antioxidants, and buttermilk contains probiotics that are beneficial for gut health. The cream cheese provides a small amount of calcium and protein. Of course, this is a dessert meant for enjoyment, not for nutritional optimization. I always remind myself that a balanced diet includes room for treats, especially ones that bring so much joy. If you are looking for a lighter option, consider serving these as a special-occasion dessert rather than an everyday snack.
For those with dietary restrictions, please note that this recipe contains wheat (gluten), dairy, and eggs. The Oreo cookies also contain wheat and soy. Check the labels of any substitutions you use to ensure they meet your dietary needs.
Conclusion
These Best Black Velvet Halloween Cupcakes with Oreo Spiders are more than just a spooky dessert—they are a testament to the fact that holiday treats can be both visually stunning and genuinely delicious. The deep, rich flavor of the black velvet cake, the tangy cream cheese frosting, and the playful Oreo spider decoration come together to create a cupcake that is as satisfying to eat as it is to look at. I have made these for countless Halloween parties, and they never fail to impress. They are the kind of dessert that makes people stop and say, “Wait, these are actually good?”
I encourage you to make this recipe your own. Experiment with the variations I have suggested, or come up with your own twist. Maybe you will add a pinch of cinnamon, or swap the cream cheese frosting for a dark chocolate ganache. The beauty of baking is that there is always room for creativity. And if you do try a variation, I would love to hear about it.
Please leave a comment below and let me know how your cupcakes turned out. Did you make the Oreo spiders? Did you try a different decoration? Share your photos and tag me on social media—I love seeing your creations. And if you are looking for more easy and impressive desserts, be sure to check out my recipe for decadent triple chocolate mousse cups. It is another showstopper that is surprisingly simple to make.
Thank you for stopping by, and happy Halloween. May your cupcakes be dark, your frosting be creamy, and your spiders be deliciously scary.
Frequently Asked Questions
Can I use regular cocoa powder instead of black cocoa powder?
You can, but the color will be a dark brown, not black. The flavor will also be different—black cocoa powder has a milder, more Oreo-like taste. If you use regular cocoa powder, you may need to add extra black gel food coloring to achieve a darker color. I recommend using black cocoa powder for the best results.
How do I get my cupcakes to be a true black color?
The key is using black cocoa powder and black gel food coloring together. The cocoa powder provides a dark base, and the gel food coloring deepens it to a true black. Make sure you are using gel, not liquid, food coloring. Also, do not be afraid to add a little extra coloring if needed. The color will darken slightly as the cupcakes bake.
Can I make these cupcakes ahead of time?
Absolutely. You can bake the cupcakes up to 2 days in advance and store them in an airtight container at room temperature. The cream cheese frosting can be made a day ahead and stored in the refrigerator. Let it come to room temperature and re-whip it before using. The Oreo spiders can be assembled up to a week in advance and stored in an airtight container.
How do I store leftover frosted cupcakes?
Store frosted cupcakes in an airtight container in the refrigerator for up to 4 days. Because of the cream cheese frosting, they must be refrigerated. Let them sit at room temperature for about 30 minutes before serving to soften the frosting and bring back the tender crumb.
Can I freeze these cupcakes?
Yes, you can freeze the unfrosted cupcakes for up to 3 months. Wrap each one tightly in plastic wrap and place them in a freezer-safe bag. Thaw at room temperature before frosting. I do not recommend freezing the frosted cupcakes, as the cream cheese frosting can become grainy and separate upon thawing.
Pin This Recipe!
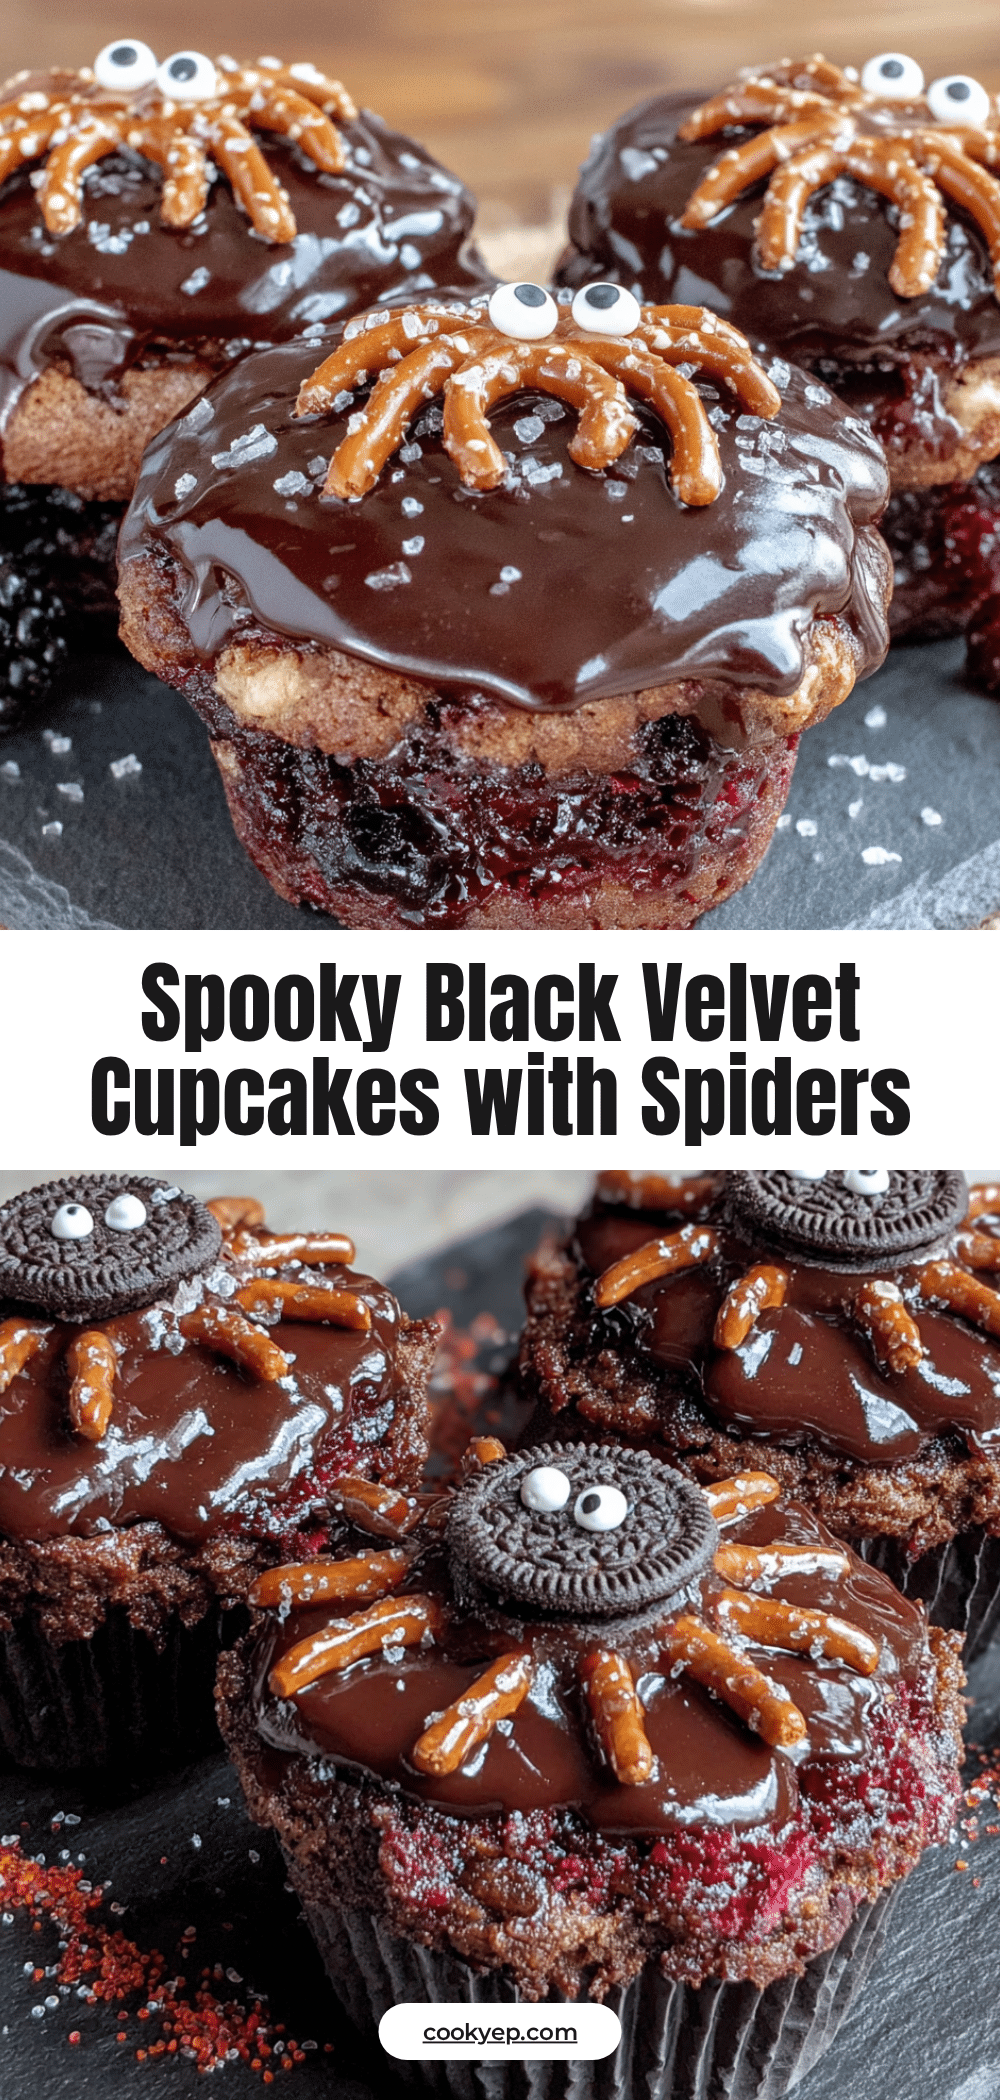
Best Black Velvet Cupcakes with Oreo Spiders (Easy Halloween Recipe)
These black velvet cupcakes are moist, rich, and deeply chocolatey, topped with tangy cream cheese frosting and a playful Oreo spider decoration. Perfect for Halloween parties, they prove that spooky desserts can be genuinely delicious.
- Prep Time: 15 minutes
- Cook Time: 20 minutes
- Total Time: 45 minutes
- Yield: 12 cupcakes 1x
- Category: Dessert
- Cuisine: American
Ingredients
- 1 ½ cups (180g) all-purpose flour
- ½ cup (45g) black cocoa powder
- 1 cup (200g) granulated sugar
- 1 teaspoon baking soda
- ½ teaspoon salt
- ¾ cup (180ml) buttermilk, room temperature
- ½ cup (120ml) vegetable oil
- 2 large eggs, room temperature
- 2 teaspoons vanilla extract
- 1–2 teaspoons black gel food coloring
- 1 teaspoon white vinegar
- 8 oz (226g) cream cheese, softened
- ½ cup (113g) unsalted butter, softened
- 3–4 cups (360-480g) powdered sugar, sifted
- 1 teaspoon vanilla extract
- Pinch of salt
- 12 whole Oreo cookies
- 48 chocolate-covered pretzel sticks
- 24 small edible candy eyes
- Black or white frosting (for attaching eyes and legs)
Instructions
- Preheat oven to 350°F (175°C). Line a 12-cup muffin tin with paper liners.
- In a large bowl, whisk together flour, black cocoa powder, sugar, baking soda, and salt.
- In a separate bowl, whisk together buttermilk, oil, eggs, vanilla extract, and black gel food coloring. Add white vinegar and whisk again.
- Pour wet ingredients into dry ingredients and fold until just combined. Do not overmix; a few lumps are fine.
- Divide batter evenly among the 12 liners, filling each about ⅔ full.
- Bake for 18-22 minutes, or until a toothpick inserted in the center comes out clean. Cool in pan for 5 minutes, then transfer to a wire rack to cool completely.
- For the frosting: Beat cream cheese and butter together until smooth. Add vanilla and salt. Gradually beat in powdered sugar until light and fluffy.
- For the Oreo spiders: Twist each Oreo apart. Use the half with cream filling. Press 4 pretzel sticks into the cream on each side for legs. Attach 2 candy eyes with a dab of frosting.
- Once cupcakes are cool, frost with cream cheese frosting using a piping bag or knife. Place one Oreo spider on top of each cupcake.
Notes
For best results, use black cocoa powder and black gel food coloring. Room temperature ingredients are essential. Do not overmix the batter. Cool cupcakes completely before frosting. Oreo spiders can be made ahead and stored in an airtight container.
Nutrition
- Serving Size: 1 cupcake
- Calories: 420
- Sugar: 38
- Sodium: 280
- Fat: 22
- Saturated Fat: 10
- Carbohydrates: 54
- Fiber: 2
- Protein: 5
Keywords: Halloween cupcakes, black velvet cupcakes, Oreo spiders, cream cheese frosting, easy Halloween dessert


