My daughter looked up from the kitchen table, meringue still clinging to her eyebrow, and said, “Mom, can we make these every single day until Halloween?” That’s when I knew this recipe was a keeper. Not because they were perfect—honestly, my first batch had lopsided eyes and a few ghosts that looked more like grumpy clouds—but because she was the one asking. She wanted to do it again. That’s the thing about these adorable ghost meringue cookies with chocolate eyes. They’re not fussy. They don’t require a pastry degree. They just need a little patience, a hot oven, and maybe a kid (or a friend) standing next to you to press those tiny chocolate chips into place.
I’d been looking for a Halloween treat that wasn’t just another sugar bomb. Something light. Something that felt like a project, not a chore. And let me tell you, these little ghosts deliver. They’re crisp on the outside, chewy on the inside, and they vanish off the plate before you can even snap a photo. The chocolate eyes stare up at you all innocent-like, but they’re gone in two bites. It’s almost criminal.
So if you’ve been scrolling through Pinterest looking for that one Halloween dessert that’s actually doable on a Tuesday night after work, this is it. These 30-minute adorable ghost meringue cookies with chocolate eyes are exactly what you need. No scary ingredients. No complicated steps. Just a little sugar, a little heat, and a whole lot of cute.
Why You’ll Love This Recipe
I’ve tested meringue recipes more times than I care to admit. Some turned out like sad, sticky puddles. Others were so dry they crumbled into dust the moment you touched them. But this version? It’s the Goldilocks of ghost cookies. Here’s why it works:
- Quick & Easy: From start to finish, you’re looking at about 30 minutes of active time. The oven does the rest of the work while you clean up or help the kids with homework.
- Simple Ingredients: You probably have everything already. Egg whites, sugar, vanilla, cream of tartar, and chocolate chips. That’s it. No weird stabilizers or specialty flours.
- Perfect for Halloween: Whether it’s a classroom party, a spooky movie night, or just a fun afternoon activity, these ghosts fit right in. They’re cute enough to impress and simple enough to make with little helpers.
- Crowd-Pleaser: I brought a batch to our neighborhood pumpkin carving night and they were gone in ten minutes. Adults went back for thirds. Kids kept asking for “the ghost ones.”
- Unbelievably Delicious: Light as air, with that signature meringue crunch that melts on your tongue. The chocolate eyes add just enough richness to balance the sweetness. Honestly, it’s hard to eat just one.
What makes these different from other meringue cookies is the texture. I use a slightly lower oven temperature and a longer drying time, which gives you that crisp shell with a soft, marshmallowy center. No hollow shells here. Plus, the chocolate eyes are pressed in at just the right moment—when the meringue is still slightly tacky—so they stay put and don’t slide off during baking. It’s a small detail, but it makes all the difference.
This recipe is the kind that makes you close your eyes after the first bite. It’s comfort food reimagined—lighter, faster, but with the same soul-soothing satisfaction. Perfect for impressing guests without stress, or turning a simple evening into something memorable.
What Ingredients You Will Need
This recipe uses simple, wholesome ingredients to deliver big flavor and that perfect meringue texture. Most of these are pantry staples, which makes it even easier to whip up a batch on a whim.
- 3 large egg whites (room temperature) — Room temperature egg whites whip up higher and hold more air. Cold eggs take forever to foam. Trust me on this one.
- ¾ cup granulated sugar (150g) — Regular white sugar works best. Avoid powdered sugar—it changes the texture and can make the meringue grainy.
- ¼ teaspoon cream of tartar — This stabilizes the egg whites and helps them hold their shape. If you don’t have it, you can use ½ teaspoon lemon juice or white vinegar instead.
- 1 teaspoon vanilla extract — Pure vanilla adds warmth and depth. Imitation works in a pinch, but the flavor won’t be as rich.
- ¼ cup mini chocolate chips (about 45g) — These become the ghost’s eyes. I prefer mini chips because they’re the perfect size. Regular chips look a little too big, but you can cut them in half if that’s all you have.
- Pinch of salt — Just a tiny bit. It balances the sweetness and helps the flavors pop.
Ingredient Tips from My Kitchen: I’ve tried this recipe with both fresh and pasteurized egg whites. Fresh ones whip up better, hands down. If you’re worried about raw eggs, use pasteurized whites from a carton, but know that they take a bit longer to reach stiff peaks. I recommend Egg Beaters or Bob’s Red Mill egg white powder if you want a reliable alternative. Also, make sure your mixing bowl is completely clean and dry. Any trace of grease or yolk will ruin your meringue. I wipe my bowl with a little lemon juice and a paper towel before I start—just to be safe.
Substitution Guidance: For a vegan version, you can try aquafaba (the liquid from a can of chickpeas). Use 3 tablespoons of aquafaba for each egg white. It whips up surprisingly well, though the texture is slightly less stable. For a sugar-free option, use a granulated monk fruit sweetener, but note that the cookies may not get quite as crisp.
Equipment Needed
You don’t need a fancy kitchen to make these adorable ghost meringue cookies with chocolate eyes. Here’s what you’ll need:
- Electric mixer (stand or hand-held) — Whipping egg whites by hand is possible, but your arm will hate you. A hand mixer works great. A stand mixer is even better because you can walk away while it does the work.
- Large mixing bowl — Glass, metal, or ceramic. Avoid plastic bowls—they can hold onto grease even after washing.
- Baking sheet — A standard half-sheet pan works perfectly. Line it with parchment paper or a silicone baking mat.
- Piping bag (or zip-top bag) — A piping bag with a round tip gives you the most control, but a zip-top bag with the corner snipped off works just fine. I’ve done it both ways.
- Rubber spatula — For folding in the chocolate chips gently.
- Cooling rack — Meringues need to cool completely before you move them. A wire rack helps them cool evenly.
Budget-Friendly Alternatives: No piping bag? No problem. You can use a sturdy zip-top bag, just don’t overfill it. I’ve also used a small cookie scoop to drop meringue onto the sheet, then shaped them into ghost forms with the back of a spoon. They won’t be as uniform, but they’ll still taste amazing. And honestly, the imperfect ones have more personality.
Maintenance Tip: After using your piping bag, rinse it immediately with hot water. Dried meringue is a nightmare to clean. I learned this the hard way after destroying two good bags.
Preparation Method
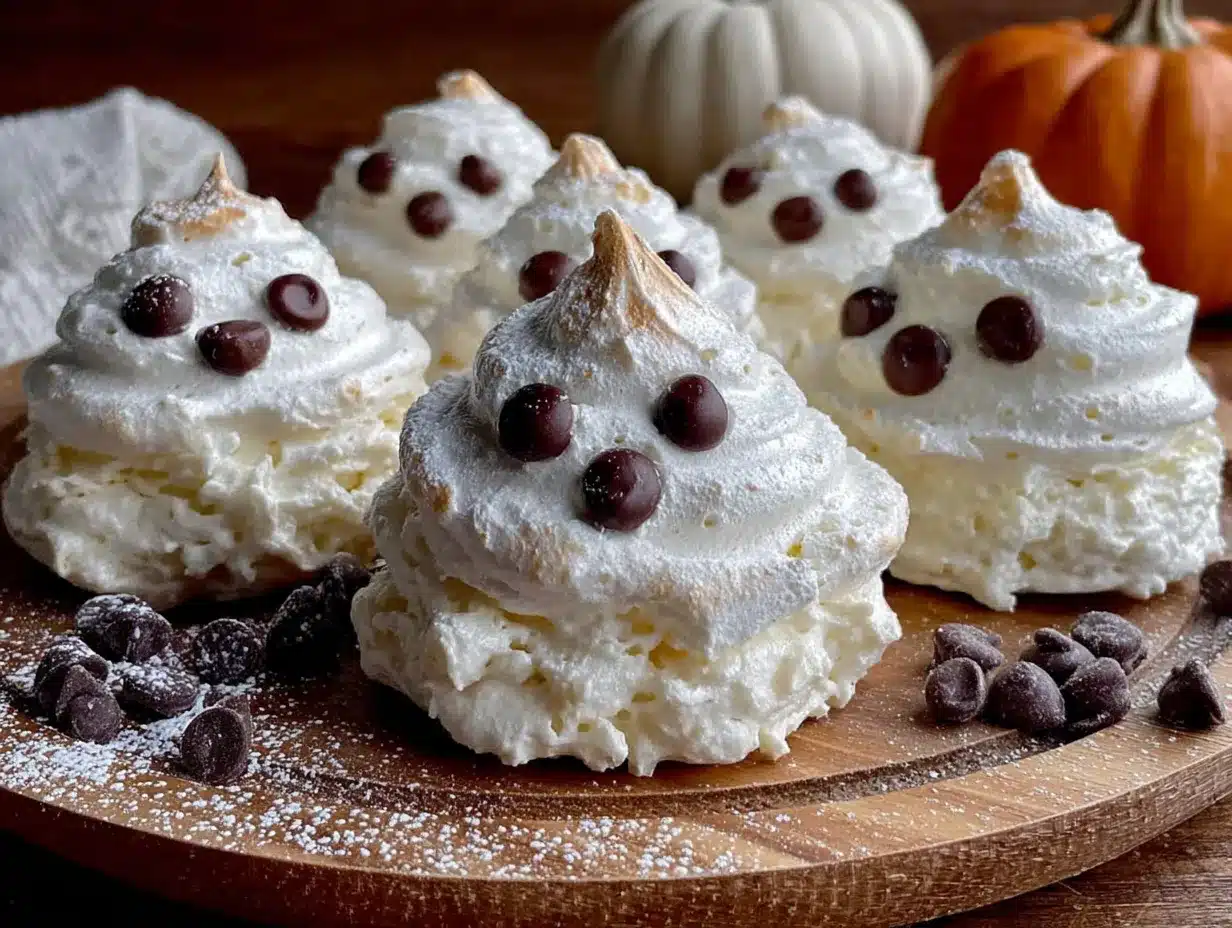
Let’s get these little ghosts ready. Follow these steps, and you’ll have a tray of adorable meringue cookies in no time.
- Preheat the oven to 200°F (95°C). Low and slow is the secret to perfect meringue. Line a baking sheet with parchment paper and set it aside.
- Prepare your egg whites. Separate the eggs while they’re cold—it’s easier. Then let the whites sit at room temperature for about 10 minutes. This step isn’t optional. Cold egg whites don’t whip up as well.
- Whip the egg whites. Add the egg whites and cream of tartar to your clean, dry mixing bowl. Start beating on medium speed until soft peaks form—about 2 minutes. The mixture should look foamy and white, with peaks that droop slightly when you lift the beater.
- Add the sugar slowly. With the mixer running on medium-high, add the sugar one tablespoon at a time. This takes patience, but it’s crucial. Adding sugar too fast can deflate the meringue. Keep beating until the mixture is thick, glossy, and holds stiff peaks. When you rub a little between your fingers, it should feel smooth, not grainy. This usually takes 5-7 minutes total.
- Add vanilla and salt. Drizzle in the vanilla and add the pinch of salt. Beat for another 30 seconds until combined.
- Fold in the chocolate chips. Gently fold in the mini chocolate chips using a rubber spatula. Don’t overmix—you want the chips distributed evenly without deflating the meringue. Save about 10 chips for the eyes if you want to place them individually later.
- Pipe the ghosts. Transfer the meringue to your piping bag fitted with a round tip. Pipe small ghost shapes onto the prepared baking sheet. Start with a small circle for the base, then pull upward to create a rounded head. For the arms, pipe two small dots on each side. Leave about 1 inch between ghosts—they don’t spread much, but you want air to circulate.
- Add the eyes. Gently press two mini chocolate chips into each ghost for eyes. Do this right after piping, while the meringue is still tacky. If you wait too long, the chips won’t stick.
- Bake. Place the baking sheet in the preheated oven and bake for 60-75 minutes. The ghosts should be dry to the touch and easily lift off the parchment. They shouldn’t be brown—just pale and slightly firm.
- Cool completely. Turn off the oven and leave the meringues inside with the door slightly ajar for another 30 minutes. This helps them dry out completely without cracking. Transfer to a wire rack and let them cool fully before serving.
Sensory Cues: At the stiff peak stage, the meringue should look like marshmallow fluff—thick, glossy, and almost too stiff to move. When you lift the beater, the peak should stand straight up without drooping. During baking, you’ll smell a faint sweet vanilla aroma, but the meringues shouldn’t brown at all. If they start to color, your oven is too hot.
Troubleshooting: If your meringue looks grainy, you added the sugar too fast. Next time, go slower. If the ghosts spread into flat puddles, your egg whites were overbeaten or the bowl had grease. If the chocolate chips sink to the bottom, your meringue is too thin—whip it a little longer next time.
Cooking Tips & Techniques
I’ve made these adorable ghost meringue cookies with chocolate eyes at least a dozen times, and I’ve learned a few things the hard way. Here are my best tips:
Don’t rush the sugar. This is the number one mistake I see. Adding sugar too fast or all at once will give you a flat, weepy meringue. Take your time. One tablespoon at a time, let it dissolve completely before adding the next. The mixture should feel smooth between your fingers, not gritty.
Check your oven temperature. Ovens lie. I’ve had ovens that run 25 degrees hot. An oven thermometer is cheap and saves you from ruined batches. If your meringues start browning, lower the temperature by 10-15 degrees next time.
Humidity is the enemy. Meringue hates moisture. Don’t make these on a rainy day—they’ll turn out sticky and soft. If you live in a humid climate, bake them a little longer and store them in an airtight container with a silica gel packet (the kind that comes in shoe boxes). It sounds weird, but it works.
Multitasking strategy: While the meringue is baking, you can clean up the kitchen, prep dinner, or even start another batch. The long bake time is actually a gift—it gives you freedom. I usually make these while I’m simmering a pot of soup or roasting vegetables.
Consistency tip: For perfectly uniform ghosts, use a piping bag with a round tip and pipe with steady, even pressure. If you’re making these with kids, let them go wild. Lopsided ghosts have more charm anyway.
Variations & Adaptations
One of the best things about this recipe is how easy it is to tweak. Here are a few variations I’ve tried and loved:
- Pumpkin Spice Ghosts: Add ½ teaspoon pumpkin pie spice and ¼ teaspoon cinnamon to the sugar before whipping. The spices give the ghosts a warm, fall flavor that pairs perfectly with the chocolate eyes. I made these for a Halloween brunch and they disappeared faster than the plain ones.
- Vegan Aquafaba Ghosts: Replace each egg white with 3 tablespoons of aquafaba (chickpea liquid). Whip it the same way—it takes a little longer to reach stiff peaks, but it works. The texture is slightly less crisp, but still delicious. Use dairy-free chocolate chips to keep it fully vegan.
- Chocolate-Dipped Ghosts: After the meringues have cooled, dip the bottoms in melted dark chocolate and let them set on parchment. It adds a rich, fudgy layer that makes them feel extra indulgent. Perfect for holiday gift boxes.
- Peppermint Ghosts: Swap the vanilla for ½ teaspoon peppermint extract. Crush a candy cane and sprinkle the crumbs on top before baking for a festive winter version. These are great for Christmas parties too.
- Mini Ghosts: Pipe smaller ghosts (about 1 inch tall) and reduce the bake time to 45-50 minutes. These are perfect for lunchboxes or party platters.
Personal Variation: My favorite twist is the pumpkin spice version. I’m a sucker for anything pumpkin-flavored, and the combination of warm spices with the light, airy meringue is just heavenly. I’ve also made a batch with a drop of orange food coloring for a more festive look—just a tiny bit, stirred in at the end. They looked like little Halloween ghosts with a sunny glow.
Serving & Storage Suggestions
These adorable ghost meringue cookies with chocolate eyes are best served at room temperature. They’re light and crisp, perfect for snacking straight from the baking sheet. Here’s how to make the most of them:
Serving Temperature: Room temperature is ideal. If you’ve stored them in the fridge (which I don’t recommend), let them sit out for 10-15 minutes before serving. Cold meringue can feel a bit chewy.
Presentation Ideas: Arrange them on a white platter for a spooky, ghostly look. Add a few candy eyeballs or mini pumpkins around the edges for a festive touch. I like to serve them alongside a bowl of warm apple cider or a pumpkin cold foam iced coffee for an afternoon Halloween treat. They also look adorable piled into a glass jar tied with a black ribbon—perfect for gifting.
Complementary Dishes: These ghosts pair beautifully with other Halloween treats. I often make a batch alongside spiderweb sugar cookie bars for a dessert table that has both crunch and chew. They’re also great with a Halloween pumpkin charcuterie board for a savory-sweet balance.
Storage Instructions: Store meringues in an airtight container at room temperature for up to 7 days. Do not refrigerate—they’ll absorb moisture and turn sticky. For longer storage, freeze them in a single layer in a freezer-safe bag for up to 3 months. Thaw at room temperature for about 15 minutes before serving.
How Flavors Develop: Meringues actually taste better the next day. The flavors meld and the texture becomes even more delicate. If you can resist eating them all on day one, you’ll be rewarded with an even better cookie on day two.
Nutritional Information & Benefits
Per serving (2 ghosts):
- Calories: 85
- Total Fat: 1.5g
- Saturated Fat: 0.8g
- Cholesterol: 0mg
- Sodium: 25mg
- Total Carbohydrates: 17g
- Dietary Fiber: 0g
- Sugars: 16g
- Protein: 1.5g
Health Benefits: Meringues are naturally fat-free and cholesterol-free, making them a lighter alternative to traditional cookies. Egg whites are a good source of protein and contain no fat. The chocolate chips add a small amount of antioxidants from cocoa. While these are still a treat, they’re significantly lower in calories and fat than most Halloween desserts.
Dietary Considerations: This recipe is naturally gluten-free and dairy-free (if you use dairy-free chocolate chips). It’s also nut-free, making it safe for school parties. For a sugar-free version, use a monk fruit sweetener, but note that the texture may be slightly different.
Potential Allergens: Eggs and chocolate (which may contain milk and soy). Always check your chocolate chip labels if you’re serving someone with allergies.
Personal Wellness Perspective: I love that these ghosts let me enjoy a sweet treat without the heavy feeling that comes with butter-laden cookies. They’re perfect for when you want something indulgent but not over-the-top. Plus, the small size makes portion control easy—though I can’t promise you’ll stop at two.
Conclusion
These adorable ghost meringue cookies with chocolate eyes are everything I want in a Halloween treat—simple, fun, and genuinely delicious. They’re the kind of recipe that brings people together, whether you’re making them with your kids or bringing a plate to a party. The best part? They’re forgiving. Your first batch might not look perfect, but they’ll still taste amazing. And honestly, the imperfect ones have the most personality.
I love that this recipe lets you be creative. Add pumpkin spice, dip them in chocolate, or just keep them classic. There’s no wrong way to make these ghosts. They’re a blank canvas for your Halloween imagination.
So go ahead—preheat that oven, whip up some meringue, and make a batch of these little guys. Then tag me in your photos or leave a comment below telling me how they turned out. Did your kids love them? Did you add a twist? I want to hear all about it. Happy Halloween, and happy baking!
Frequently Asked Questions
Can I make these ghost meringue cookies ahead of time?
Absolutely. These cookies store beautifully in an airtight container at room temperature for up to a week. You can even freeze them for up to 3 months. Just make sure they’re completely cool before storing, and don’t refrigerate them—moisture is the enemy of meringue.
Why did my meringue turn out flat?
Flat meringue usually means one of three things: your bowl had grease or yolk residue, your egg whites weren’t at room temperature, or you added the sugar too quickly. Make sure your bowl is spotless, let your eggs warm up, and add sugar one tablespoon at a time. Also, avoid making meringue on humid days.
Can I use regular chocolate chips instead of mini chips?
You can, but mini chips work better. Regular chips are too big for the ghost’s eyes—they look a little cartoonish. If that’s all you have, cut each chip in half with a sharp knife. Or just use them whole and call them “big-eyed ghosts.” It’s Halloween, after all.
How do I know when the meringues are done baking?
They’re done when they lift easily off the parchment paper without sticking. The outside should be dry and crisp, but the inside should still be slightly soft—like a marshmallow. They shouldn’t be brown. If they start to color, your oven is too hot.
Can I make these without a piping bag?
Yes! Use a sturdy zip-top bag with the corner snipped off. Or just drop spoonfuls of meringue onto the baking sheet and shape them into ghost forms with the back of a spoon. They won’t be as uniform, but they’ll still taste amazing. Plus, the imperfect ones have more personality.
Pin This Recipe!

30-Minute Adorable Ghost Meringue Cookies with Chocolate Eyes
These adorable ghost meringue cookies with chocolate eyes are light, crisp on the outside, and chewy on the inside. Perfect for Halloween, they’re quick to make with simple ingredients and are a fun project for kids and adults alike.
- Prep Time: 15 minutes
- Cook Time: 60-75 minutes
- Total Time: 1 hour 30 minutes
- Yield: 24 servings 1x
- Category: Dessert
- Cuisine: American
Ingredients
- 3 large egg whites (room temperature)
- ¾ cup granulated sugar (150g)
- ¼ teaspoon cream of tartar
- 1 teaspoon vanilla extract
- ¼ cup mini chocolate chips (about 45g)
- Pinch of salt
Instructions
- Preheat the oven to 200°F (95°C). Line a baking sheet with parchment paper and set it aside.
- Separate the eggs while cold, then let the whites sit at room temperature for about 10 minutes.
- Add the egg whites and cream of tartar to a clean, dry mixing bowl. Beat on medium speed until soft peaks form, about 2 minutes.
- With the mixer running on medium-high, add the sugar one tablespoon at a time. Beat until the mixture is thick, glossy, and holds stiff peaks, about 5-7 minutes total.
- Drizzle in the vanilla and add the pinch of salt. Beat for another 30 seconds until combined.
- Gently fold in the mini chocolate chips using a rubber spatula. Save about 10 chips for the eyes if desired.
- Transfer the meringue to a piping bag fitted with a round tip. Pipe small ghost shapes onto the prepared baking sheet, starting with a small circle for the base and pulling upward to create a rounded head. Pipe two small dots on each side for arms. Leave about 1 inch between ghosts.
- Gently press two mini chocolate chips into each ghost for eyes right after piping, while the meringue is still tacky.
- Bake for 60-75 minutes until the ghosts are dry to the touch and easily lift off the parchment.
- Turn off the oven and leave the meringues inside with the door slightly ajar for another 30 minutes. Transfer to a wire rack and let cool completely before serving.
Notes
Don’t rush the sugar—add one tablespoon at a time. Avoid making meringue on humid days. For perfectly uniform ghosts, use a piping bag with a round tip. Lopsided ghosts have more charm. Store in an airtight container at room temperature for up to 7 days. Do not refrigerate. Freeze for up to 3 months.
Nutrition
- Serving Size: 2 ghosts
- Calories: 85
- Sugar: 16
- Sodium: 25
- Fat: 1.5
- Saturated Fat: 0.8
- Carbohydrates: 17
- Protein: 1.5
Keywords: ghost meringue cookies, Halloween cookies, meringue cookies, chocolate eyes, easy Halloween dessert, ghost cookies, meringue ghosts


