Third time in a week I’d made these black velvet cupcakes, and this time I finally remembered to set out the cream cheese before I started mixing. That little detail—room-temperature dairy—had been the difference between a frosting that looked like a dream and one that fought me every step of the way. The first batch? Frosting curdled. The second? Tasted fine but had those tiny lumps you try to convince yourself no one will notice. By the third go, I had it down. The batter came together in ten minutes flat, the kitchen smelled like vanilla and something almost like cocoa but darker, and the frosting whipped up so smooth it practically begged to be piped into a dramatic swirl.
I wasn’t even planning to make cupcakes that week. But then I saw a bag of black cocoa powder sitting in my pantry—leftover from a phase where I was determined to master the darkest possible baked goods—and I just couldn’t leave it alone. There’s something about that color, you know? It’s not just black. It’s almost charcoal gray with a faint purple undertone, and when you add the tangy white cream cheese frosting on top, the contrast is honestly kind of stunning. It feels like Halloween on a plate, but without the sticky artificial dye aftertaste.
These aren’t complicated. They’re not fussy. But they are the kind of cupcake that makes people stop mid-bite and look at the thing in their hand like they’ve just discovered something. That’s the moment that kept me coming back to the mixing bowl—not the drama of the color, but the quiet satisfaction of getting it just right.
Why You’ll Love This Recipe
Let me tell you why these black velvet Halloween cupcakes with cream cheese frosting have earned a permanent spot in my fall baking rotation. I’ve tested this recipe about five times now—yes, really—and each batch taught me something small but important. The first lesson? You don’t need food coloring to get that deep, dramatic color. Black cocoa powder does all the heavy lifting, and it adds a subtle Oreo-like flavor that regular cocoa just can’t match.
- Quick & Easy : From start to finish, you’re looking at about 45 minutes. The batter comes together in one bowl, no stand mixer required. That’s faster than a trip to the bakery.
- Simple Ingredients : Butter, sugar, eggs, flour, buttermilk, and black cocoa powder—that’s the whole list. No weird additives, no neon gels, no hunting down specialty stores.
- Perfect for Halloween Parties : These are the cupcakes that disappear first from the dessert table. Kids love the color, adults love the flavor, and everyone loves the cream cheese frosting.
- Crowd-Pleaser : I brought a batch to a neighbor’s Halloween get-together last weekend, and three people asked for the recipe before the night ended. One person said they “weren’t really into Halloween desserts” and then ate two.
- Unbelievably Delicious : The texture is what gets you. These cupcakes are tender, moist, and light—nothing like the dry, crumbly black cupcakes you sometimes see at bakeries. The tangy frosting cuts through the richness perfectly.
What makes this version different from the rest? It’s the balance. A lot of black velvet recipes lean too hard on the cocoa, making the cupcake taste bitter or dusty. I adjusted the ratio so you get that dark color and subtle chocolate flavor without any harshness. And the cream cheese frosting? It’s not too sweet, not too tangy—just right. This is the kind of cupcake that makes you close your eyes after the first bite, even if you’re standing over the kitchen counter in your pajamas.
If you’re looking for other spooky treats to round out your Halloween spread, my easy no-bake Halloween Oreo truffle eyeballs are always a hit too.
What Ingredients You Will Need
This recipe uses simple, wholesome ingredients to deliver that dramatic black color and velvety texture without any artificial dyes or hard-to-find components. Most of these are pantry staples, and the black cocoa powder is the only specialty item—but it’s widely available online and in well-stocked grocery stores these days.
For the Cupcakes
- All-purpose flour, 1 ½ cups (190g) – Spoon and level for accuracy; don’t scoop directly from the bag or you’ll end up with dense cupcakes.
- Black cocoa powder, ½ cup (45g) – This is the star. I prefer the brand Rodelle for its deep color and smooth flavor. Regular Dutch-process cocoa will not give you the same dark result.
- Granulated sugar, 1 cup (200g) – Standard white sugar keeps the texture light.
- Baking soda, 1 teaspoon – Helps the cupcakes rise and stay tender.
- Salt, ½ teaspoon – Balances the sweetness and enhances the cocoa flavor.
- Unsalted butter, ½ cup (113g), softened – Room temperature is key. Cold butter won’t cream properly with the sugar.
- Vegetable oil, ¼ cup (60ml) – Adds moisture that butter alone can’t provide. This is my secret for cupcakes that stay soft for days.
- Large eggs, 2, room temperature – If you’re in a hurry, place the eggs in a bowl of warm water for 5 minutes.
- Vanilla extract, 2 teaspoons – Pure vanilla, not imitation, makes a noticeable difference.
- Buttermilk, 1 cup (240ml), room temperature – The acidity activates the baking soda and keeps the crumb tender. No buttermilk? Add 1 tablespoon of white vinegar or lemon juice to regular milk and let it sit for 5 minutes.
- White vinegar, 1 teaspoon – This extra acid helps the black cocoa powder bloom and deepens the color.
For the Cream Cheese Frosting
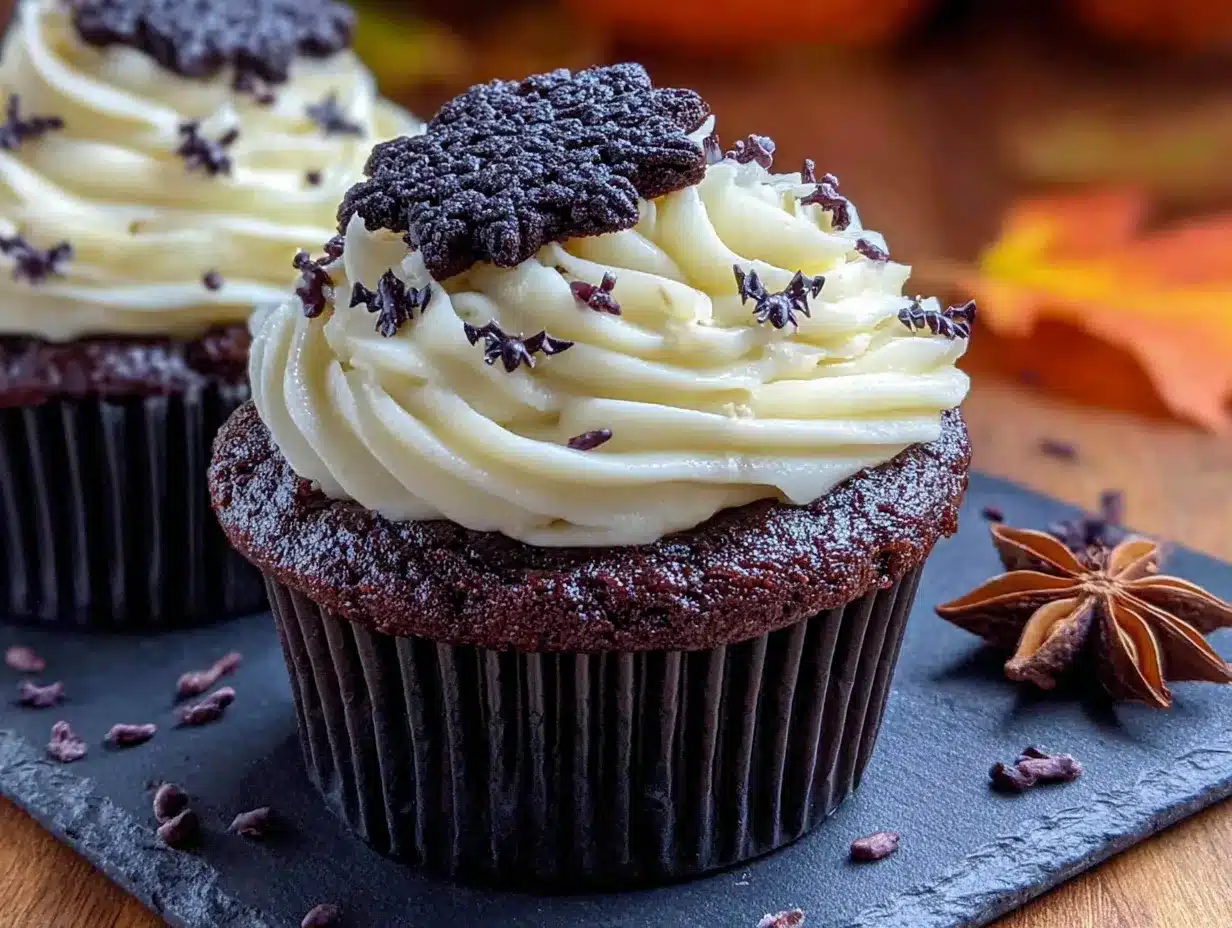
- Cream cheese, 8 ounces (226g), softened – Full-fat block cream cheese works best. Avoid the spreadable tub kind; it has too much water and will make your frosting runny.
- Unsalted butter, ½ cup (113g), softened – Adds stability and richness to the frosting.
- Powdered sugar, 3 cups (360g), sifted – Sifting removes lumps and gives you that silky-smooth finish.
- Vanilla extract, 1 teaspoon – Pure vanilla again, please.
- Pinch of salt – Just a tiny bit to balance the sweetness.
If you want to get creative with decorations, crushed Oreos or candy eyeballs make fun toppings. For a more elaborate presentation, you could pipe the frosting into tall swirls and add a spiderweb sugar cookie on top for an impressive layered effect.
Equipment Needed
You don’t need a professional bakery setup to make these black velvet Halloween cupcakes. Here’s what you’ll want on hand:
- Standard 12-cup muffin tin – Nonstick is fine, but I still recommend lining it with paper cupcake liners for easy removal and a cleaner look.
- Paper cupcake liners – White or black liners work well. Black liners make the color contrast with the frosting even more dramatic.
- Mixing bowls – One large bowl for the dry ingredients, one medium bowl for the wet ingredients.
- Hand mixer or stand mixer – A hand mixer works perfectly for both the cupcake batter and the frosting. I’ve made this recipe with a whisk by hand once, and while it’s doable, your arm will definitely feel it.
- Whisk – For combining dry ingredients evenly.
- Rubber spatula – For scraping down the bowl and folding in the dry ingredients.
- Cooling rack – Letting the cupcakes cool completely before frosting is non-negotiable. Warm cupcakes will melt the cream cheese frosting into a puddle.
- Piping bag and star tip – I use a Wilton 1M tip for that classic swirl look. If you don’t have a piping bag, a zip-top bag with the corner snipped off works in a pinch.
- Cookie scoop or ice cream scoop – Helps portion the batter evenly so all your cupcakes bake at the same rate.
If you’re baking on a budget, dollar-store mixing bowls and a basic hand mixer will do the job just fine. I started with both and only upgraded when they literally broke after years of use.
Preparation Method
Let’s walk through this step by step. I’ll include the little details I wish someone had told me the first time I made black velvet cupcakes.
Step 1: Preheat and Prepare
Preheat your oven to 350°F (175°C). Line your muffin tin with 12 paper liners. If you want extra insurance against sticking, give the inside of the liners a quick spritz of nonstick spray.
Step 2: Mix the Dry Ingredients
In a large mixing bowl, whisk together 1 ½ cups (190g) all-purpose flour, ½ cup (45g) black cocoa powder, 1 cup (200g) granulated sugar, 1 teaspoon baking soda, and ½ teaspoon salt. Whisk for about 20 seconds to make sure everything is evenly distributed. Black cocoa powder tends to clump, so break up any lumps with your fingers or the back of a spoon.
Step 3: Combine the Wet Ingredients
In a separate medium bowl, whisk together ½ cup (113g) softened unsalted butter, ¼ cup (60ml) vegetable oil, 2 large eggs, 2 teaspoons vanilla extract, 1 cup (240ml) buttermilk, and 1 teaspoon white vinegar. Whisk until the mixture is smooth and well combined. The butter should be fully incorporated—no little yellow flecks floating around.
Step 4: Combine Wet and Dry
Pour the wet ingredients into the bowl of dry ingredients. Use a rubber spatula to fold everything together gently. Mix just until you no longer see streaks of flour—about 15 to 20 strokes. Overmixing will make the cupcakes tough. The batter will be thin, almost like a thick pancake batter, and that’s exactly what you want.
Step 5: Fill the Liners
Use a cookie scoop or a measuring cup to divide the batter evenly among the 12 liners. Fill each about ⅔ full. Don’t overfill, or the cupcakes will dome too much and you’ll have trouble with the frosting.
Step 6: Bake
Bake for 16 to 20 minutes. At the 16-minute mark, insert a toothpick into the center of a cupcake. If it comes out clean or with just a few moist crumbs, they’re done. If the toothpick has wet batter on it, give them another 2 minutes and check again. The tops should spring back lightly when touched.
Step 7: Cool Completely
Let the cupcakes cool in the pan for 5 minutes, then transfer them to a wire cooling rack. Cool completely before frosting—at least 30 minutes. If you’re in a hurry, pop them in the fridge for 15 minutes, but make sure they’re not even slightly warm to the touch.
Step 8: Make the Cream Cheese Frosting
While the cupcakes cool, make the frosting. In a large bowl, beat 8 ounces (226g) softened cream cheese and ½ cup (113g) softened unsalted butter together with a hand mixer on medium speed until smooth and creamy—about 2 minutes. Scrape down the sides of the bowl. Add 1 teaspoon vanilla extract and a pinch of salt, then beat again. Gradually add 3 cups (360g) sifted powdered sugar, one cup at a time, beating on low speed after each addition. Once all the sugar is incorporated, increase the speed to medium-high and beat for 2 to 3 minutes until the frosting is light, fluffy, and spreadable.
Step 9: Frost and Decorate
Fit a piping bag with a star tip and fill it with the frosting. Pipe a generous swirl onto each cooled cupcake. If you’re feeling extra festive, top with crushed Oreos, candy eyeballs, or a drizzle of white chocolate. For a simpler look, just a swirl of frosting is beautiful on its own.
Cooking Tips & Techniques
I learned most of these the hard way—by making mistakes and eating the evidence. Let me save you some trouble.
Don’t skip the vinegar. I know it seems like a small amount, but the extra acid helps the black cocoa powder develop its deepest color. Without it, your cupcakes might turn out a disappointing dark gray instead of that dramatic almost-black. Trust me, I made that mistake on batch number two.
Room temperature ingredients matter more than you think. Cold butter doesn’t cream properly. Cold eggs can make the batter seize up. Cold cream cheese creates lumpy frosting. Set everything out on the counter about 30 minutes before you start baking. It makes a real difference.
Black cocoa powder is messy. It’s finer than regular cocoa and tends to puff up into a dark cloud when you whisk it. I recommend wearing an apron and being careful not to inhale the dust. Also, it stains like crazy, so don’t wear your favorite white shirt.
Check your oven temperature. Ovens run hot or cold more often than you’d expect. An oven thermometer is a cheap investment that saves you from overbaked or underbaked cupcakes. My old oven ran 25 degrees hot, and I burned two batches before I figured it out.
Multitask wisely. While the cupcakes are baking, wash your mixing bowls so they’re ready for the frosting. While the cupcakes cool, make the frosting. This way, everything comes together without a frantic last-minute rush.
Variations & Adaptations
One of the best things about this recipe is how flexible it is. Here are a few ways to make it your own:
- Gluten-Free Version : Substitute the all-purpose flour with a 1:1 gluten-free baking flour blend. I’ve tested this with Bob’s Red Mill 1:1 Baking Flour, and the texture was surprisingly close to the original. Add ¼ teaspoon of xanthan gum if your blend doesn’t already include it.
- Dairy-Free Adaptation : Use vegan butter and a dairy-free cream cheese alternative like Kite Hill or Miyoko’s. Replace the buttermilk with 1 cup of unsweetened almond milk mixed with 1 tablespoon of lemon juice. The flavor will be slightly different, but the texture holds up well.
- Peppermint Twist : Add ½ teaspoon of peppermint extract to the frosting instead of vanilla. Top with crushed candy canes for a holiday-themed version. This variation works beautifully for Christmas parties, and it pairs nicely with my easy peppermint bark chocolate bites for a full dessert spread.
- Spiced Variation : Add 1 teaspoon of cinnamon and ½ teaspoon of nutmeg to the dry ingredients. The warm spices complement the dark cocoa beautifully and make the cupcakes feel cozier for fall gatherings.
- Cupcake to Cake Conversion : Pour the batter into two greased 8-inch round cake pans and bake at 350°F (175°C) for 22 to 25 minutes. Double the frosting recipe for a layered cake that’s perfect for Halloween birthdays.
Serving & Storage Suggestions
These black velvet Halloween cupcakes taste best at room temperature. The frosting softens slightly, the cake stays tender, and the flavors are more pronounced than when they’re cold straight from the fridge.
For serving, arrange them on a black or white cake stand for maximum visual impact. They pair wonderfully with a warm drink—try serving them alongside a cozy copycat gingerbread latte for the ultimate fall treat combination. The spicy, sweet latte balances the tangy cream cheese frosting perfectly.
Storage: Store unfrosted cupcakes in an airtight container at room temperature for up to 3 days. Frosted cupcakes should be refrigerated in a sealed container for up to 5 days. The cream cheese frosting needs refrigeration, but let the cupcakes sit at room temperature for about 20 minutes before serving to take the chill off.
Freezing: You can freeze unfrosted cupcakes for up to 3 months. Wrap each one tightly in plastic wrap, then place them in a freezer-safe bag. Thaw at room temperature before frosting. Frosted cupcakes can also be frozen, but the texture of the cream cheese frosting may change slightly upon thawing.
One thing I’ve noticed: the flavor actually improves after a day in the fridge. The black cocoa powder mellows out, and the vanilla becomes more pronounced. So if you can wait, these are even better the next day.
Nutritional Information & Benefits
Let’s be real—these are cupcakes, not health food. But here’s what you should know if you’re keeping an eye on nutrition.
Estimated per cupcake (with frosting):
Calories: 410 | Fat: 22g | Carbohydrates: 52g | Protein: 5g | Sugar: 38g | Fiber: 2g
Health highlights: Black cocoa powder contains antioxidants called flavonoids, which are also found in dark chocolate. It has less fat and sugar than regular cocoa powder, though the amounts are small enough that it’s not a significant source. The cream cheese adds a bit of protein and calcium, but again, we’re talking about frosting here.
Dietary considerations: This recipe contains gluten, dairy, and eggs. It can be adapted to be gluten-free or dairy-free using the substitutions mentioned earlier. It is not suitable for vegan diets in its current form, though a vegan cream cheese alternative would work for the frosting.
My take: I’m a firm believer in balance. These cupcakes are a treat, meant for celebrations and special occasions. Enjoy one (or two) without guilt, and pair them with a balanced meal the rest of the day. Life’s too short to skip the cream cheese frosting.
Conclusion
These black velvet Halloween cupcakes with cream cheese frosting are the kind of recipe that looks impressive but feels completely doable. You don’t need to be a professional baker to pull them off. The batter comes together in one bowl, the frosting whips up in minutes, and the result is a cupcake that looks like it came from a fancy bakery.
What I love most about this recipe is how it brings people together. There’s something about that dramatic black color and the swirl of white frosting that makes everyone stop and smile. Kids light up. Adults get nostalgic. And the flavor—that subtle Oreo-like cocoa with the tangy, creamy frosting—keeps them coming back for seconds.
I’d love to see how yours turn out. Did you add any fun toppings? Try a different variation? Leave a comment below and let me know. And if you’re planning a Halloween party, these cupcakes deserve a spot on your dessert table. They’re the ones people will remember.
Happy baking—and happy Halloween!
Frequently Asked Questions
Can I use regular cocoa powder instead of black cocoa powder?
You can, but the color will be brown, not black. Regular Dutch-process cocoa will give you a dark brown cupcake that tastes more like traditional chocolate. If you want that dramatic black color, stick with black cocoa powder.
Why did my cream cheese frosting turn out runny?
This usually happens for one of three reasons: your cream cheese was too soft (almost melted), you used low-fat or spreadable cream cheese, or you added the powdered sugar too quickly. Make sure your cream cheese is softened but still cool, use full-fat block cream cheese, and add the powdered sugar gradually.
Can I make these cupcakes ahead of time?
Absolutely. Bake the cupcakes up to two days in advance and store them unfrosted in an airtight container. Make the frosting the day you plan to serve them. You can also freeze unfrosted cupcakes for up to three months.
How do I get the frosting to look like the photos?
A piping bag with a star tip (like Wilton 1M) is your best friend. Start from the outside edge and work your way inward in a spiral, then lift straight up. If the frosting feels too soft, chill it in the fridge for 10 minutes before piping.
Can I make these cupcakes without a mixer?
Yes. You can whisk the batter by hand—just be careful not to overmix. For the frosting, you’ll want a hand mixer or stand mixer. Beating cream cheese and butter by hand until fluffy is tough work, and the results won’t be as smooth.
PrintPerfect Black Velvet Halloween Cupcakes with Easy Cream Cheese Frosting
These black velvet Halloween cupcakes are tender, moist, and feature a dramatic charcoal-black color from black cocoa powder, topped with a tangy cream cheese frosting. They’re quick to make, use simple ingredients, and are perfect for Halloween parties.
- Prep Time: 15 minutes
- Cook Time: 20 minutes
- Total Time: 45 minutes
- Yield: 12 cupcakes 1x
- Category: Dessert
- Cuisine: American
Ingredients
- 1 ½ cups (190g) all-purpose flour
- ½ cup (45g) black cocoa powder
- 1 cup (200g) granulated sugar
- 1 teaspoon baking soda
- ½ teaspoon salt
- ½ cup (113g) unsalted butter, softened
- ¼ cup (60ml) vegetable oil
- 2 large eggs, room temperature
- 2 teaspoons vanilla extract
- 1 cup (240ml) buttermilk, room temperature
- 1 teaspoon white vinegar
- 8 ounces (226g) cream cheese, softened
- ½ cup (113g) unsalted butter, softened (for frosting)
- 3 cups (360g) powdered sugar, sifted
- 1 teaspoon vanilla extract (for frosting)
- Pinch of salt (for frosting)
Instructions
- Preheat oven to 350°F (175°C). Line a 12-cup muffin tin with paper liners.
- In a large bowl, whisk together flour, black cocoa powder, sugar, baking soda, and salt until evenly combined.
- In a separate medium bowl, whisk together softened butter, vegetable oil, eggs, vanilla extract, buttermilk, and white vinegar until smooth.
- Pour the wet ingredients into the dry ingredients and fold gently with a rubber spatula until just combined (about 15-20 strokes). Batter will be thin.
- Divide batter evenly among the 12 liners, filling each about ⅔ full.
- Bake for 16-20 minutes, until a toothpick inserted in the center comes out clean or with a few moist crumbs. Cool in pan for 5 minutes, then transfer to a wire rack to cool completely.
- For the frosting: In a large bowl, beat cream cheese and butter with a hand mixer on medium speed until smooth and creamy (about 2 minutes). Add vanilla and salt, beat again. Gradually add powdered sugar, one cup at a time, beating on low. Increase speed to medium-high and beat for 2-3 minutes until light and fluffy.
- Fit a piping bag with a star tip, fill with frosting, and pipe a generous swirl onto each cooled cupcake. Decorate as desired.
Notes
Room temperature ingredients are crucial for best results. Don’t skip the vinegar; it helps deepen the color. Black cocoa powder is messy and stains, so wear an apron. For gluten-free, use a 1:1 gluten-free flour blend. For dairy-free, use vegan butter and dairy-free cream cheese. Frosted cupcakes should be refrigerated; let sit at room temperature 20 minutes before serving. Unfrosted cupcakes can be frozen for up to 3 months.
Nutrition
- Serving Size: 1 cupcake
- Calories: 410
- Sugar: 38
- Sodium: 280
- Fat: 22
- Saturated Fat: 12
- Carbohydrates: 52
- Fiber: 2
- Protein: 5
Keywords: black velvet cupcakes, Halloween cupcakes, cream cheese frosting, black cocoa powder, easy cupcakes, Halloween dessert


