I was sitting on my kitchen floor. Not in a dramatic way, just tired from a long week and staring at a can of pumpkin puree that had been in my pantry since last October. I had been looking for a fall dessert that actually delivered on both fronts—real pumpkin flavor and that creamy, tangy richness you only get from good cheesecake. Most pumpkin desserts lean too hard on the spice blend and forget the actual pumpkin. Or worse, they’re dry. I wanted something that felt like a reward, not a compromise.
For a while, I just accepted that pumpkin cheesecake bars were going to be either too dense or too cakey. The ones from the bakery were always beautiful but somehow tasted more like artificial flavoring than the real thing. And the homemade versions I tried? Let’s just say I’ve had my fair share of cracked tops and soggy crusts. It was frustrating because the concept is so simple—pumpkin, cream cheese, warm spices, a little crunch. But getting the texture right took more patience than I expected.
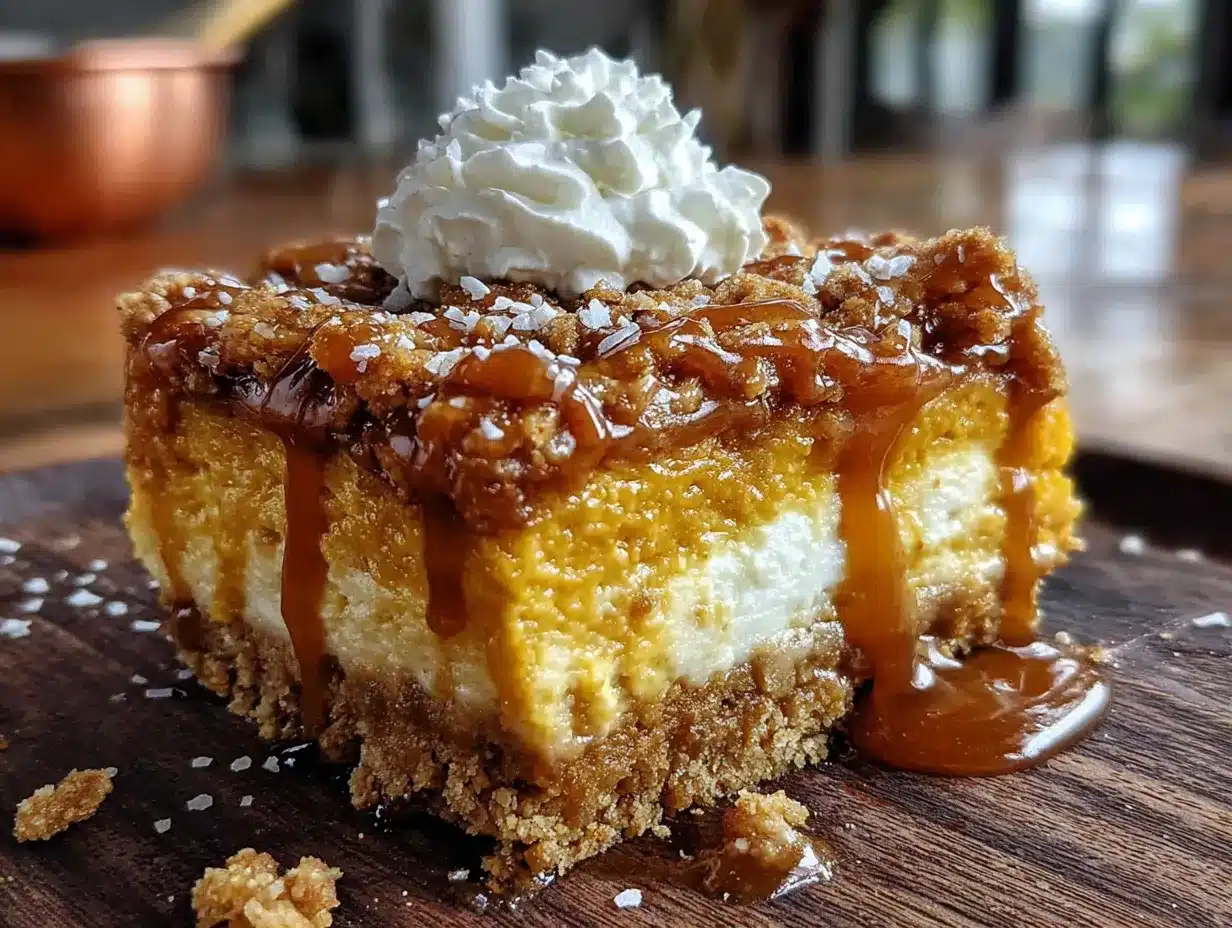
Then one afternoon, during a rare quiet moment in the kitchen, I decided to stop following the rules. I swapped out the usual graham cracker crust for a buttery shortbread base that could actually hold up to the filling. I added a swirl of homemade salted caramel because, honestly, why not? And I stopped overmixing the cheesecake layer, which turned out to be the secret to that silky, melt-in-your-mouth texture I’d been chasing. The first batch came out of the oven, and I just stood there looking at them. No cracks. No sinking. Just perfect little bars with caramel pooling on top.
These salted caramel pumpkin cheesecake bars ended up being the dessert I now bring to every fall gathering. They’re the ones people ask for by name. And honestly, they’re the reason I stopped buying pumpkin desserts from the store altogether. Sometimes the best recipes come from being a little stubborn and refusing to settle.
Why You’ll Love This Recipe
Let me tell you why these bars have become my most-requested fall dessert. First off, they’re surprisingly easy to put together. The shortbread crust doesn’t require rolling or chilling—just press it into the pan and you’re good to go. The cheesecake layer comes together in one bowl, and the pumpkin layer is even simpler. You don’t need a stand mixer or any fancy equipment. Just a little patience and a good spatula.
- Quick & Easy: From start to finish, you’re looking at about 45 minutes of active work. The rest is just baking and chilling time, which is totally hands-off.
- Simple Ingredients: No weird extracts or hard-to-find items. You probably have most of these in your kitchen right now. Canned pumpkin, cream cheese, butter, sugar, eggs, and a few spices.
- Perfect for Fall Gatherings: These bars are ideal for Thanksgiving, Friendsgiving, Halloween parties, or just a cozy weekend treat. They travel well and slice cleanly, which is more than I can say for regular cheesecake.
- Crowd-Pleaser: I’ve served these to kids, adults, and even picky relatives who claim they don’t like pumpkin. Every single time, the pan comes back empty.
- Unbelievably Delicious: The combination of buttery shortbread, creamy cheesecake, spiced pumpkin, and salted caramel is next-level. It’s the kind of dessert that makes people close their eyes after the first bite.
What makes these bars different from every other pumpkin cheesecake recipe out there? It’s the texture. The shortbread crust stays crisp even after refrigeration. The cheesecake layer is dense but not heavy, and the pumpkin layer is light and almost mousse-like. The salted caramel on top isn’t just a garnish—it seeps into the edges and creates little pockets of salty-sweet goodness. This isn’t just another pumpkin dessert. It’s the one you’ll make every year.
These salted caramel pumpkin cheesecake bars hit that sweet spot between indulgent and comforting. They’re rich enough to feel like a special occasion dessert but simple enough to make on a random Tuesday night when you’re craving something cozy. And honestly, that’s the best kind of recipe to have in your back pocket.
What Ingredients You Will Need
This recipe uses simple, wholesome ingredients to deliver bold flavor and satisfying texture without the fuss. Most of these are pantry staples, especially if you bake during the fall season. Here’s what you’ll need and why each one matters.
For the Shortbread Crust
- 1 ½ cups all-purpose flour – Provides structure without making the crust tough. I’ve used King Arthur Flour for years and it never lets me down.
- ½ cup granulated sugar – Adds just enough sweetness to balance the salty caramel later.
- ½ cup unsalted butter, cold and cubed – Cold butter is key here. It creates a tender, crumbly texture that holds together after baking. If you only have salted butter, just reduce the added salt by half.
- ¼ teaspoon salt – Enhances the buttery flavor and keeps the crust from tasting flat.
For the Cheesecake Layer
- 16 oz cream cheese, softened – Full-fat cream cheese gives the best texture. I’ve tried reduced-fat versions and the bars come out less creamy. Philadelphia is my go-to brand.
- ½ cup granulated sugar – Sweetens the cheesecake without overpowering the tanginess.
- 2 large eggs, room temperature – Room temperature eggs blend more smoothly into the batter, reducing the risk of lumps. Take them out of the fridge about 30 minutes before starting.
- 1 teaspoon vanilla extract – Use pure vanilla extract if you have it. It makes a noticeable difference in flavor.
- 2 tablespoons all-purpose flour – This helps stabilize the cheesecake and prevents cracking as it bakes.
For the Pumpkin Layer
- 1 cup canned pumpkin puree – Make sure you’re buying pure pumpkin puree, not pumpkin pie filling. The filling has added sugar and spices that will throw off the balance. Libby’s is reliable and widely available.
- ¼ cup granulated sugar – Adds sweetness to balance the earthy pumpkin flavor.
- 1 large egg – Helps the pumpkin layer set properly.
- 1 teaspoon pumpkin pie spice – You can use store-bought or make your own with cinnamon, nutmeg, ginger, and cloves. If you’re feeling adventurous, try my cozy pumpkin chocolate chip bread for another way to use that spice blend.
- ½ teaspoon cinnamon – Adds warmth and depth.
- ¼ teaspoon salt – Don’t skip this. Salt makes the pumpkin flavor pop and balances the sweetness.
For the Salted Caramel Swirl
- ½ cup granulated sugar – For the caramel base. You’ll cook this until it turns amber.
- 3 tablespoons unsalted butter, cubed – Adds richness and helps create that smooth, pourable consistency.
- ¼ cup heavy cream, room temperature – Cold cream will cause the caramel to seize up. Let it sit out for 10 minutes before using.
- ½ teaspoon flaky sea salt – Maldon is my favorite for this. The flakes provide little bursts of saltiness that cut through the sweetness perfectly.
For Topping (Optional but Recommended)
- Additional flaky sea salt – Just a pinch right before serving makes a big difference.
- Whipped cream – Adds a light, airy contrast to the dense bars.
If you’re looking for a dairy-free option, you can substitute the cream cheese with a high-quality vegan cream cheese and use coconut cream instead of heavy cream in the caramel. The texture will be slightly different but still delicious.
Equipment Needed
You don’t need a professional kitchen to make these bars. Here’s what you’ll need:
- 9×9-inch baking pan – Glass or metal both work fine. If you use metal, line it with parchment paper for easy removal. I prefer a metal pan because it conducts heat more evenly for the crust.
- Parchment paper – Makes lifting the bars out of the pan effortless. Leave an overhang on two sides for handles.
- Electric hand mixer or stand mixer – You can mix the crust by hand, but the cheesecake and pumpkin layers benefit from a mixer to ensure smooth, lump-free batter. A hand mixer works perfectly.
- Medium mixing bowls – You’ll need at least two: one for the crust and one for the cheesecake mixture.
- Small saucepan – For making the caramel. A light-colored pan helps you see the color change as the sugar cooks.
- Rubber spatula – For scraping down the sides of the bowl and spreading the batter evenly.
- Sharp knife – For clean slices. Run it under hot water and wipe it clean between cuts for the best results.
If you don’t have a 9×9 pan, an 8×8 pan will work but you’ll need to increase the baking time by about 5 minutes. A 9×13 pan will give you thinner bars that bake faster, so check them at the 25-minute mark. I’ve made these in a disposable foil pan before for potlucks, and they turned out just fine.
Preparation Method
Let’s walk through this step by step. I’ll include visual cues and timing so you know exactly what to expect at each stage.
Step 1: Prepare the Crust (10 minutes active + 15 minutes baking)
Preheat your oven to 350°F (175°C). Line your 9×9 baking pan with parchment paper, leaving about 2 inches of overhang on two opposite sides. This will be your handles for lifting the bars out later.
In a medium bowl, combine the flour, sugar, and salt for the crust. Add the cold, cubed butter and use a pastry cutter or your fingertips to work the butter into the flour mixture until it resembles coarse sand with a few pea-sized butter pieces remaining. Don’t overwork it—you want the butter to stay cold. Press the mixture evenly into the bottom of the prepared pan. Use the bottom of a measuring cup to get it flat and compact.
Bake the crust for 15 minutes, until the edges are just starting to turn golden. The center will still look pale. Let it cool on a wire rack while you prepare the fillings. Don’t skip this cooling step—a hot crust will start cooking the cheesecake layer prematurely.
Step 2: Make the Cheesecake Layer (10 minutes)
In a large mixing bowl, beat the softened cream cheese with an electric mixer on medium speed until smooth and creamy, about 2 minutes. Scrape down the sides and bottom of the bowl with a rubber spatula. Add the sugar and beat for another minute until fully incorporated.
Add the eggs one at a time, beating on low speed after each addition just until combined. Overmixing at this stage incorporates too much air, which can cause cracks during baking. Add the vanilla extract and flour, and mix on low until just combined. Set the bowl aside.
Step 3: Make the Pumpkin Layer (5 minutes)
In a separate bowl, whisk together the pumpkin puree, sugar, egg, pumpkin pie spice, cinnamon, and salt until smooth. It should be thick but pourable. If it looks watery, your pumpkin puree might have excess moisture—give it a quick stir in the can first.
Step 4: Assemble the Bars (5 minutes)
Spread the cheesecake mixture evenly over the cooled crust. Use an offset spatula or the back of a spoon to smooth it out. Drop spoonfuls of the pumpkin mixture on top of the cheesecake layer. Don’t worry about covering it completely—you’ll swirl it in.
Use a butter knife or skewer to gently swirl the pumpkin into the cheesecake. I like to do figure-eight motions and avoid over-swirling. You want distinct ribbons of pumpkin and cheesecake, not a uniform orange mixture. Less is more here.
Step 5: Make the Salted Caramel (10 minutes)
While the bars are assembling, start the caramel. Place the sugar in a small saucepan over medium heat. Stir constantly with a heatproof spatula or wooden spoon. The sugar will clump at first, then melt into a liquid. Keep stirring until it turns a deep amber color, about 6 to 8 minutes. Watch it carefully—caramel can go from perfect to burnt in seconds.
Remove the pan from heat and immediately add the cubed butter. It will bubble up vigorously, so stand back. Stir until the butter is fully melted and incorporated. Slowly pour in the heavy cream while stirring constantly. The mixture will smooth out and become glossy. Stir in the flaky sea salt. Let the caramel cool for 5 minutes before drizzling.
Step 6: Swirl and Bake (35-40 minutes)
Drizzle about half the caramel over the swirled cheesecake-pumpkin mixture. Reserve the rest for topping after baking. Use a knife to gently swirl the caramel into the top layer. Don’t go too deep—you want the caramel to stay mostly on top.
Bake at 350°F (175°C) for 35 to 40 minutes. The edges should be set and slightly puffed, but the center will still jiggle slightly when you shake the pan. That’s normal—it will continue to set as it cools. If the top starts browning too quickly, tent the pan loosely with foil after 25 minutes.
Step 7: Cool and Chill (4 hours minimum)
Let the bars cool completely on a wire rack, about 1 hour. Once they’re at room temperature, refrigerate them uncovered for at least 3 hours, preferably overnight. This step is crucial for clean slices. The bars need time to firm up fully.
After chilling, drizzle the remaining caramel on top and sprinkle with additional flaky sea salt. Lift the bars out of the pan using the parchment overhang and transfer to a cutting board. Use a sharp knife to slice into 16 squares. Wipe the knife clean between cuts for the prettiest presentation.
Cooking Tips & Techniques
I’ve made these bars more times than I can count, and I’ve learned a few things along the way. Here are the tips that make the biggest difference.
Room temperature ingredients are non-negotiable. I know it’s tempting to use cold cream cheese straight from the fridge, but you’ll end up with a lumpy batter that bakes unevenly. Take the cream cheese, eggs, and heavy cream out 30 minutes before you start. If you forget, you can soften the cream cheese in the microwave on 50% power in 10-second bursts.
Don’t overmix the cheesecake batter. This was my biggest mistake early on. Overmixing incorporates too much air, which creates bubbles that rise to the surface and cause cracks. Mix just until each ingredient is incorporated, then stop. A few small lumps are better than a cracked top.
Use a water bath? Nope. Unlike traditional cheesecake, these bars don’t need a water bath. The shortbread crust and the shorter baking time mean they’re much more forgiving. Just don’t open the oven door during the first 30 minutes of baking.
Watch that caramel like a hawk. I’ve burned more batches of caramel than I’d like to admit. The sugar can go from pale gold to burnt in less than a minute. Swirl the pan gently instead of stirring once the sugar starts melting, and remove it from heat as soon as it reaches a deep amber color. If you see smoke, you’ve gone too far.
Patience with chilling pays off. I know you want to dive in right away, but cutting these bars while they’re still warm will result in a gooey mess. The minimum 3-hour chill time is essential for clean slices. Overnight is even better. Trust me on this one.
If you’re looking for another dessert that benefits from proper chilling, these no-bake strawberry icebox cake follow the same principle—time in the fridge transforms them into something special.
Variations & Adaptations
One of the best things about this recipe is how adaptable it is. Here are some variations I’ve tried and loved.
Gluten-Free Version: Substitute the all-purpose flour in the crust with a 1:1 gluten-free baking flour blend. I’ve used Bob’s Red Mill with great results. The texture will be slightly more crumbly, so press the crust firmly into the pan. For the cheesecake layer, use a gluten-free flour blend or cornstarch instead of regular flour.
Dairy-Free Version: Use a high-quality vegan cream cheese like Miyoko’s or Violife. For the caramel, substitute the butter with vegan butter and the heavy cream with full-fat coconut cream. The caramel will have a slight coconut flavor, which actually pairs nicely with the pumpkin.
Spice It Up: Add a pinch of cayenne pepper or chipotle powder to the pumpkin layer for a subtle heat that contrasts beautifully with the sweet caramel. I tried this one year on a whim and it was a hit at my Friendsgiving gathering.
Chocolate Twist: Melt ½ cup of semi-sweet chocolate chips and drizzle it over the top along with the caramel. The combination of chocolate, pumpkin, and salted caramel is surprisingly good. If you love pumpkin and chocolate together, you should try my chocolate chip pumpkin muffins—they’re a breakfast-appropriate version of the same flavor combo.
Make It a Pie: Press the crust into a 9-inch pie dish instead of a square pan, and bake the crust for 12 minutes before adding the fillings. You’ll need to increase the final bake time to about 45 minutes. The presentation is gorgeous for Thanksgiving.
Serving & Storage Suggestions
These bars are best served chilled, straight from the refrigerator. The cold temperature keeps the cheesecake firm and the crust crisp. If you prefer a softer texture, let them sit at room temperature for 10 to 15 minutes before serving.
For presentation, I like to arrange the bars on a white platter with a light dusting of cinnamon and a few extra flakes of sea salt on top. A dollop of whipped cream on each bar makes them look extra special. If you’re serving these at a party, you can drizzle a little extra caramel over the platter right before serving for that wow factor.
Storage: Store leftover bars in an airtight container in the refrigerator for up to 5 days. Place a sheet of parchment paper between layers to prevent sticking. The caramel may soften slightly over time, but the bars will still taste amazing.
Freezing: These bars freeze beautifully. Wrap individual slices tightly in plastic wrap, then place them in a freezer-safe bag or container. They’ll keep for up to 3 months. To thaw, transfer a slice to the refrigerator overnight. The crust will stay crisp and the cheesecake will be just as creamy as the day you made it.
Reheating: I don’t recommend reheating these bars. They’re meant to be served cold. If you want a warm dessert, try my soft-baked pumpkin snickerdoodle cookies instead—they’re perfect warm from the oven.
The flavors actually deepen after a day or two in the fridge. The pumpkin spice melds with the caramel, and the cheesecake becomes even creamier. So if you can resist eating them all on day one, you’re in for a treat on day three.
Nutritional Information & Benefits
Here’s the estimated nutritional breakdown for one bar (based on 16 servings):
- Calories: 310
- Total Fat: 20g
- Saturated Fat: 12g
- Cholesterol: 85mg
- Sodium: 220mg
- Total Carbohydrates: 30g
- Dietary Fiber: 1g
- Sugars: 22g
- Protein: 5g
These numbers are estimates and will vary based on the specific brands and substitutions you use.
On the health front, pumpkin is the star here. It’s packed with vitamin A, which supports eye health and immune function. It also provides fiber and potassium. The cream cheese adds calcium and protein, though it’s definitely an indulgence. The shortbread crust is buttery and rich, but the portion size is reasonable at one bar per serving.
If you’re watching your sugar intake, you can reduce the sugar in the cheesecake and pumpkin layers by a quarter cup without affecting the texture too much. The caramel is harder to adjust since sugar is the main ingredient, but you can use a sugar-free caramel sauce if needed.
These bars are not gluten-free, dairy-free, or low-carb by default, but the variations section above offers options for each dietary need. As always, check your ingredient labels if you’re cooking for someone with allergies.
Conclusion
These salted caramel pumpkin cheesecake bars are everything I wanted in a fall dessert and more. They’re rich without being heavy, sweet without being cloying, and the salted caramel adds that little edge of sophistication that makes them feel special. The shortbread crust stays perfectly crisp, the cheesecake is silky and tangy, and the pumpkin layer is warm and spiced. It’s a combination that just works.
I love that this recipe doesn’t require any fancy techniques or hard-to-find ingredients. It’s approachable enough for a beginner baker but impressive enough to serve at a holiday dinner. The hardest part is waiting for them to chill, and honestly, that’s a good problem to have.
If you make these bars, I’d love to hear how they turn out. Leave a comment below and let me know if you tried any variations or if they became a new tradition in your home. Don’t forget to share a photo on Pinterest and tag me—I love seeing your creations. And if you’re looking for more fall dessert inspiration, check out my creamy pumpkin cheesecake bars for a simpler version that skips the caramel.
Happy baking, friends. May your caramel never burn and your cheesecake never crack.
Frequently Asked Questions
Can I use fresh pumpkin instead of canned?
Yes, but you’ll need to roast and puree it first. Fresh pumpkin has more water content than canned, so you should strain the puree through a cheesecloth or fine-mesh sieve for about an hour before using. Otherwise, the pumpkin layer may be too loose and affect the texture of the bars.
Why did my cheesecake layer crack?
Cracking usually happens from overmixing or overbaking. Make sure you mix the cheesecake batter just until combined, and don’t open the oven door during baking. The center should still jiggle slightly when you take it out—it will firm up as it cools. If cracks do appear, the caramel swirl will hide them beautifully.
Can I make the caramel ahead of time?
Absolutely. You can make the salted caramel up to a week in advance and store it in an airtight container in the refrigerator. Let it come to room temperature before drizzling, or gently warm it in the microwave in 10-second bursts, stirring between each. If it’s too thick, add a splash of heavy cream to loosen it up.
How do I get clean, neat slices?
The key is patience. Chill the bars for at least 4 hours, preferably overnight. Use a sharp knife and run it under hot water, wiping it dry between each cut. This melts through the caramel and cheesecake cleanly without dragging. For the first cut, press straight down without sawing back and forth.
Can I double this recipe for a larger pan?
Yes, you can double the ingredients and bake them in a 9×13-inch pan. Increase the crust baking time to 18 minutes and the final bake time to 45 to 50 minutes. Keep an eye on the top and tent with foil if it browns too quickly. You’ll get about 24 bars from a doubled batch.
Pin This Recipe!
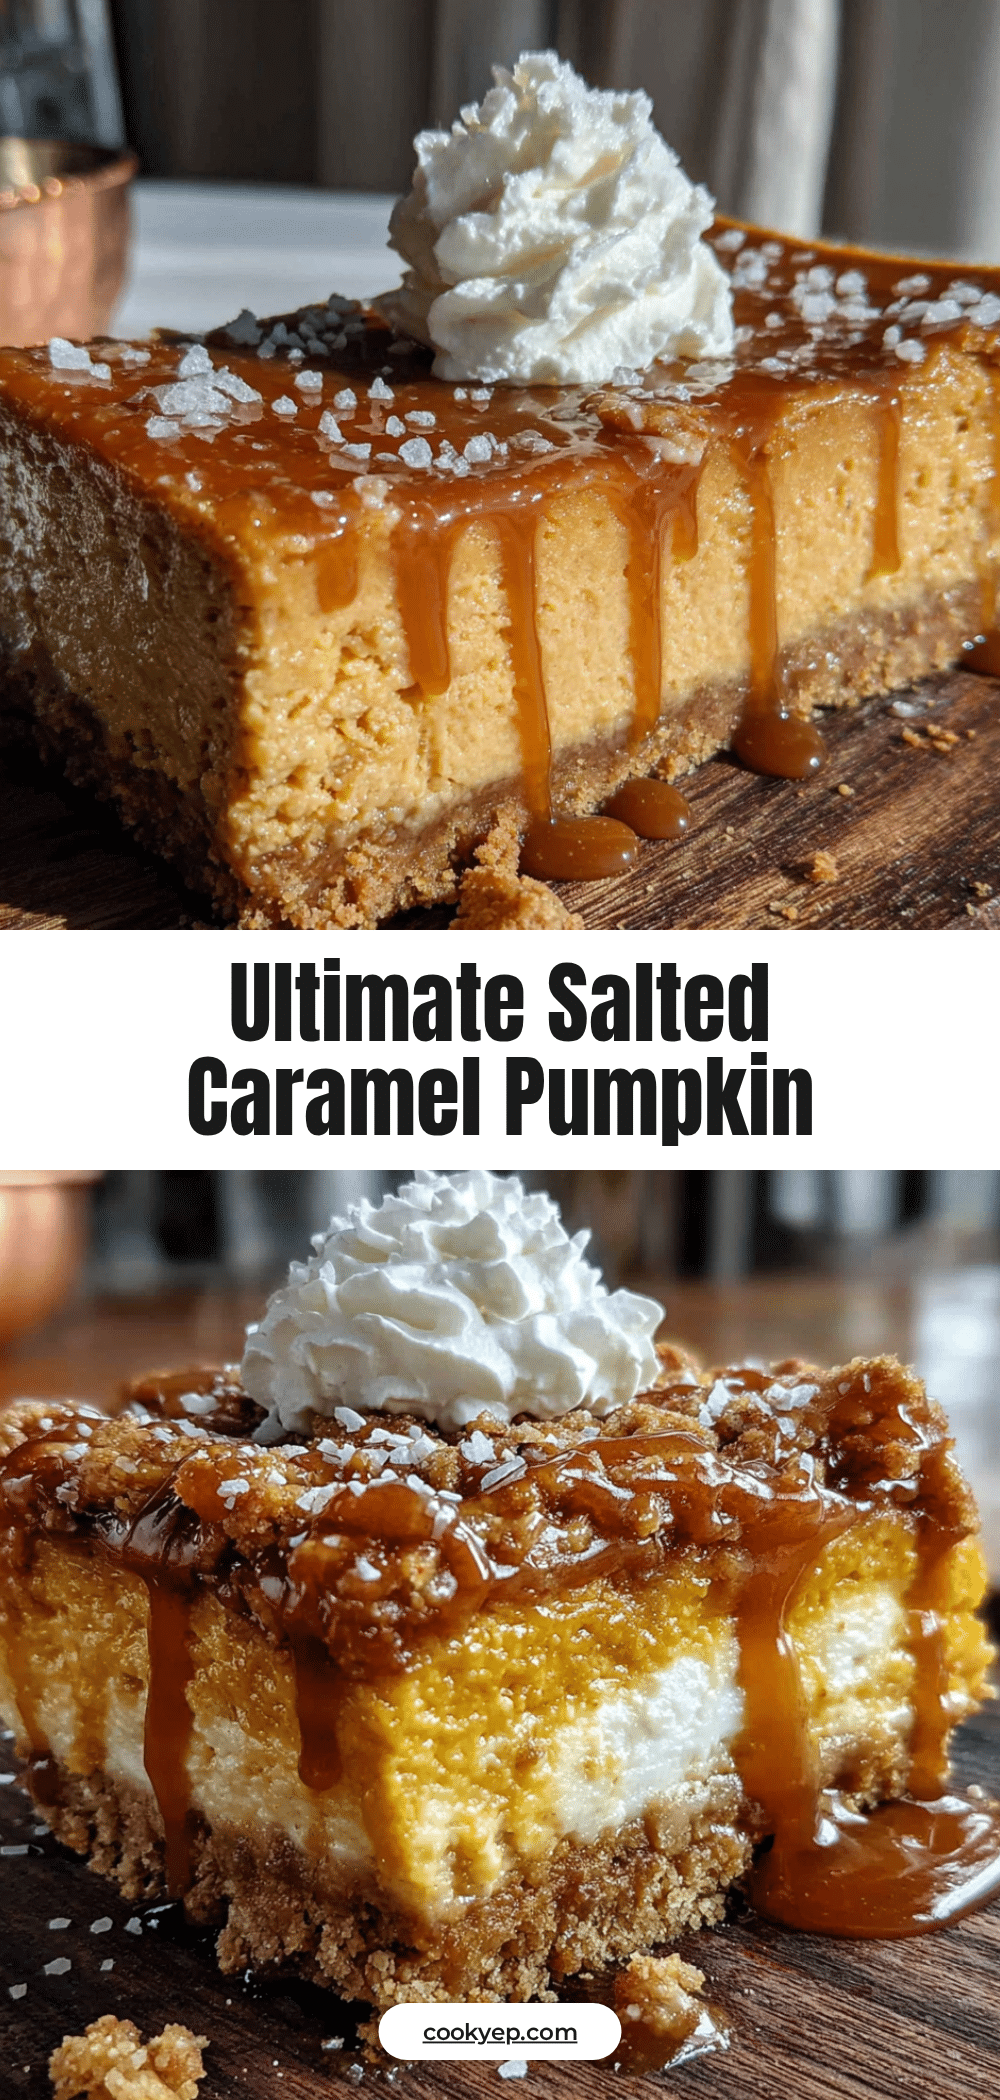
Salted Caramel Pumpkin Cheesecake Bars: Easy Fall Dessert
These salted caramel pumpkin cheesecake bars feature a buttery shortbread crust, creamy cheesecake, spiced pumpkin, and a salted caramel swirl. They’re the perfect easy fall dessert that delivers real pumpkin flavor and a silky texture.
- Prep Time: 45 minutes
- Cook Time: 35 minutes
- Total Time: 4 hours 20 minutes (includes chilling)
- Yield: 16 servings 1x
- Category: Dessert
- Cuisine: American
Ingredients
- 1 ½ cups all-purpose flour
- ½ cup granulated sugar
- ½ cup unsalted butter, cold and cubed
- ¼ teaspoon salt
- 16 oz cream cheese, softened
- ½ cup granulated sugar
- 2 large eggs, room temperature
- 1 teaspoon vanilla extract
- 2 tablespoons all-purpose flour
- 1 cup canned pumpkin puree
- ¼ cup granulated sugar
- 1 large egg
- 1 teaspoon pumpkin pie spice
- ½ teaspoon cinnamon
- ¼ teaspoon salt
- ½ cup granulated sugar
- 3 tablespoons unsalted butter, cubed
- ¼ cup heavy cream, room temperature
- ½ teaspoon flaky sea salt
- Additional flaky sea salt for topping
- Whipped cream for serving (optional)
Instructions
- Preheat oven to 350°F (175°C). Line a 9×9-inch baking pan with parchment paper, leaving overhang on two sides.
- Prepare the crust: In a medium bowl, combine 1 ½ cups flour, ½ cup sugar, and ¼ teaspoon salt. Cut in ½ cup cold cubed butter until mixture resembles coarse sand. Press evenly into prepared pan. Bake 15 minutes until edges are golden. Cool on a wire rack.
- Make the cheesecake layer: In a large bowl, beat 16 oz softened cream cheese until smooth. Add ½ cup sugar and beat until incorporated. Add 2 eggs one at a time, beating on low after each. Mix in 1 teaspoon vanilla and 2 tablespoons flour until just combined. Set aside.
- Make the pumpkin layer: In a separate bowl, whisk together 1 cup pumpkin puree, ¼ cup sugar, 1 egg, 1 teaspoon pumpkin pie spice, ½ teaspoon cinnamon, and ¼ teaspoon salt until smooth.
- Assemble: Spread cheesecake mixture over cooled crust. Drop spoonfuls of pumpkin mixture on top. Gently swirl with a knife to create ribbons.
- Make the salted caramel: In a small saucepan over medium heat, cook ½ cup sugar, stirring constantly, until deep amber (6-8 minutes). Remove from heat, add 3 tablespoons cubed butter (careful of bubbling), then stir in ¼ cup heavy cream and ½ teaspoon flaky sea salt. Let cool 5 minutes.
- Drizzle half the caramel over the bars and gently swirl. Reserve remaining caramel.
- Bake at 350°F for 35-40 minutes until edges are set but center jiggles slightly. Tent with foil if browning too quickly.
- Cool completely on a wire rack (about 1 hour), then refrigerate uncovered for at least 3 hours or overnight.
- After chilling, drizzle remaining caramel on top and sprinkle with additional flaky sea salt. Lift bars out using parchment, slice into 16 squares, and serve chilled.
Notes
Room temperature ingredients are crucial for a smooth batter. Don’t overmix the cheesecake to avoid cracks. The bars need at least 3 hours of chilling for clean slices. Caramel can be made up to a week ahead and stored in the fridge.
Nutrition
- Serving Size: 1 bar
- Calories: 310
- Sugar: 22
- Sodium: 220
- Fat: 20
- Saturated Fat: 12
- Carbohydrates: 30
- Fiber: 1
- Protein: 5
Keywords: pumpkin cheesecake bars, salted caramel, fall dessert, easy cheesecake bars, pumpkin dessert, shortbread crust