Best Homemade Elderberry Syrup for Immune Support
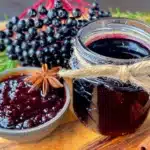
This homemade elderberry syrup is a simple, effective immune booster made with dried elderberries, raw honey, and warming spices. It’s kid-approved, cost-effective, and perfect for cold season.
- Prep Time: 15 minutes
- Cook Time: 30 minutes
- Total Time: 45 minutes
- Yield: 4 servings 1x
- Category: Condiment
- Cuisine: American
Ingredients
Scale
- 1 cup dried elderberries
- 4 cups filtered water
- 1 cup raw honey
- 2 inches fresh ginger root, peeled and sliced into thin rounds
- 2 whole cinnamon sticks
- 1 teaspoon whole cloves
- Strips from 1 medium orange peel (avoid white pith)
Instructions
- Prepare your ingredients. Measure out 1 cup of dried elderberries and give them a quick rinse under cool water in a fine-mesh strainer. Peel and slice the ginger into thin rounds. Use a vegetable peeler to remove strips of orange peel, avoiding the white pith. Set everything aside.
- Combine berries, water, and spices. In your medium saucepan, add the rinsed elderberries, 4 cups of filtered water, the sliced ginger, cinnamon sticks, whole cloves, and orange peel strips. Give it a gentle stir with your wooden spoon.
- Bring to a gentle boil. Place the saucepan over medium-high heat and bring the mixture to a gentle boil. You’ll see small bubbles breaking the surface — not a rolling, violent boil. This should take about 5-7 minutes. Watch it carefully so it doesn’t boil over.
- Reduce to a simmer and cover. Once it reaches a gentle boil, reduce the heat to low and cover the saucepan with the lid. Let it simmer gently for 30 minutes. I set a timer because I’ve definitely gotten distracted and let it go for 45 minutes — the result was noticeably more bitter and less flavorful.
- Check the color and consistency. After 30 minutes, the liquid should be a deep, dark purple-black color, and the berries should look plumped and slightly softened. The liquid should have reduced by about a third. If it looks too thin, let it simmer uncovered for another 5-10 minutes.
- Strain the mixture. Place your fine-mesh strainer or cheesecloth-lined colander over a large glass measuring cup or bowl. Carefully pour the mixture through the strainer. Use the back of a spoon to gently press on the berries to extract as much liquid as possible — but don’t press too hard, or you’ll push through bitter compounds from the seeds.
- Let the liquid cool slightly. Let the strained liquid sit for about 10-15 minutes until it’s warm but not hot. This is important — if you add honey to boiling-hot liquid, you’ll destroy the beneficial enzymes in the raw honey.
- Stir in the honey. Once the liquid has cooled to warm (think comfortable bath temperature), add 1 cup of raw honey. Stir gently with your wooden spoon until the honey is completely dissolved. The mixture will become slightly thicker and take on a beautiful amber-golden hue.
- Pour into jars. Using your funnel, pour the syrup into clean glass jars, leaving about half an inch of headspace at the top. Wipe the rims clean with a damp cloth and screw on the lids tightly.
- Cool completely before refrigerating. Let the jars cool to room temperature on the counter — this usually takes about an hour. Once cool, transfer them to the refrigerator. The syrup will thicken slightly as it chills.
Notes
Don’t rush the simmer; 30 minutes is ideal. Let the liquid cool to around 100-110°F before adding honey to preserve its beneficial enzymes. Use a timer to avoid over-simmering. Sterilize jars properly for longer storage. Label jars with the date. The syrup keeps for 2-3 months in the refrigerator or up to 6 months frozen in ice cube trays.
Nutrition
- Serving Size: 1 tablespoon
- Calories: 45
- Sugar: 11
- Carbohydrates: 12
Keywords: elderberry syrup, immune support, homemade syrup, elderberry recipe, natural remedy, cold season, honey syrup