Fourth time in two weeks and I finally stopped peeking. That was the moment I knew this crispy honey garlic baked chicken thighs recipe had me in a chokehold. The first batch came out okay—edible, even—but the skin was more chewy than crackly, and the glaze slid off like it didn’t belong there. The second time, I cranked the heat too fast and ended up with burnt edges and a sticky mess on the pan that took fifteen minutes to scrub off. Third time, I got close. The texture was there, the garlic had mellowed into something sweet and deep, but the honey-to-soy ratio felt off—too cloying, like dessert pretending to be dinner.
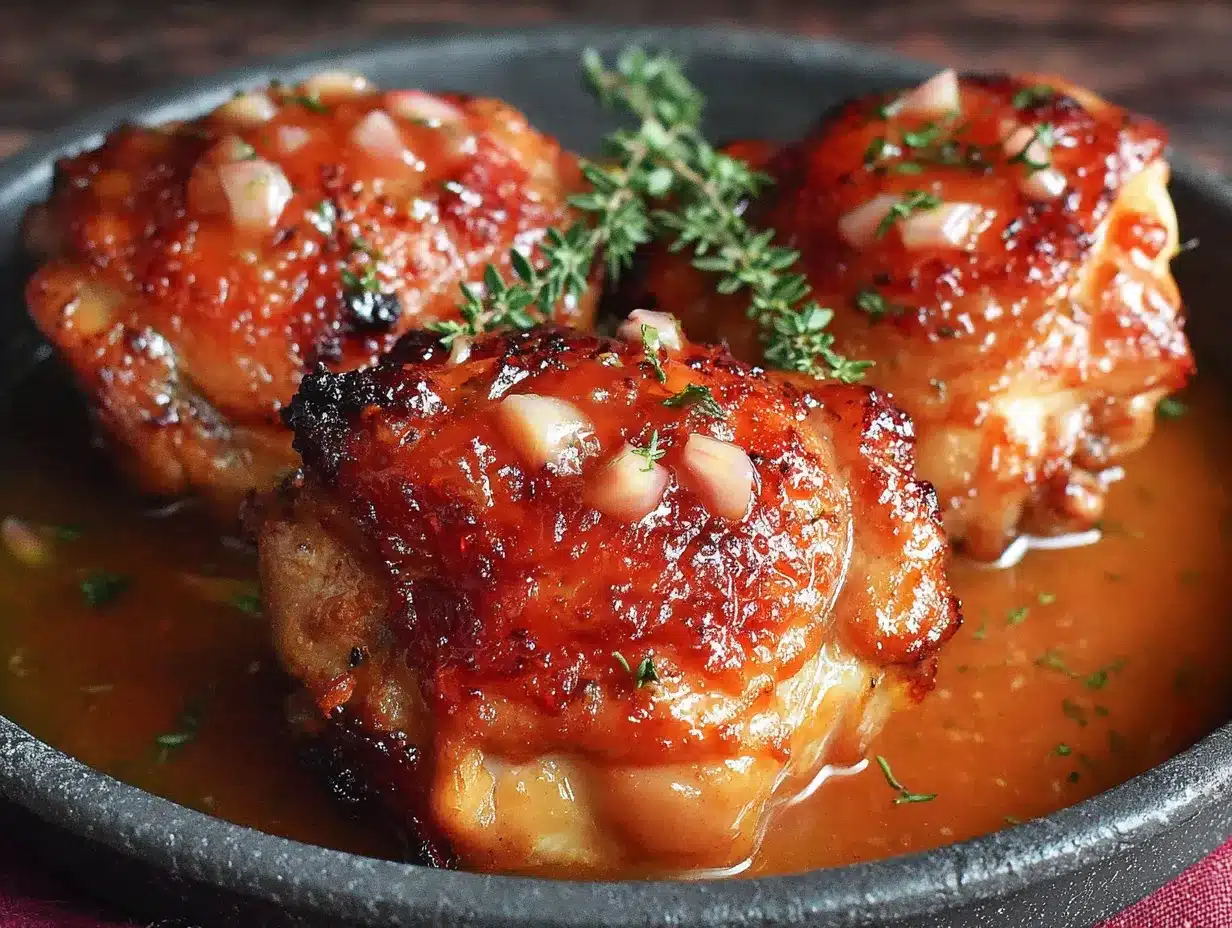
By attempt number four, I stopped hovering over the oven. I let the thighs sit untouched for the first twenty minutes, no opening the door to check, no basting every five seconds. When I finally pulled them out, the skin had blistered into these golden-brown shards that shattered when I bit into them. The garlic clung to every ridge like it had been painted on. And the honey—it had caramelized into a sticky, savory-sweet coating that made my kitchen smell like a restaurant kitchen on a Friday night. I stood at the counter eating one straight off the baking sheet, and honestly, I didn’t feel bad about it at all. (I ate three. No regrets.)
This isn’t a recipe I grew up with or learned from my grandmother. It came from a Tuesday night desperation moment—chicken thighs thawed, fridge mostly empty, and a craving for something that felt special without requiring a trip to the store. The magic is in the method: high heat, a simple glaze, and the patience to let the oven do the work. If you’ve ever wanted restaurant-quality crispy skin without the deep fryer, this one’s for you.
Why You’ll Love This Recipe
Let me tell you why this crispy honey garlic baked chicken thighs recipe is about to become your new weeknight hero. I’ve tested this more times than I care to admit, and each batch taught me something new about getting that perfect balance of sticky, sweet, and savory with skin so crispy it rivals fried chicken.
- Quick & Easy: From fridge to table in under 30 minutes. No marinating overnight, no complicated steps—just a simple glaze and a hot oven.
- Simple Ingredients: You probably have everything in your pantry right now. Honey, soy sauce, garlic, chicken thighs—that’s it. No fancy grocery trips required.
- Perfect for Busy Weeknights: This is the kind of dinner that feels like a treat but comes together faster than takeout delivery. Great for those nights when you want something impressive without the stress.
- Crowd-Pleaser: I’ve served these at casual dinners and holiday gatherings, and they disappear every single time. Kids love the sweetness, adults love the savory depth.
- Unbelievably Crispy: The secret is a combination of high heat and a technique I figured out after trial and error. No breading, no frying—just pure, crackling skin that stays crispy even under the glaze.
What makes this recipe different from all the other honey garlic chicken recipes out there? It’s the method. Most recipes either boil the glaze into a sticky mess or end up with soggy skin. I spent weeks figuring out the exact oven temperature, the perfect glaze consistency, and the timing that gives you that shatteringly crisp exterior without drying out the meat. This isn’t just another version—it’s the version I’d serve to anyone who thinks baked chicken thighs can’t compete with fried.
There’s something about that first bite that makes you close your eyes. The crunch gives way to juicy, tender meat, and the honey-garlic glaze hits your tongue with this perfect salty-sweet punch. It’s comfort food that feels a little fancy but takes almost no effort. Perfect for impressing guests without breaking a sweat, or turning a random Tuesday into something worth remembering.
What Ingredients You Will Need
This recipe keeps things simple. You don’t need a long grocery list or obscure ingredients. Everything here pulls double duty—building flavor, creating texture, or both. Here’s what you’ll need and why each ingredient matters.
For the Chicken
- Bone-in, skin-on chicken thighs (6-8 pieces, about 2.5 lbs / 1.1 kg): This is non-negotiable for the crispiest results. The bone keeps the meat juicy during high-heat cooking, and the skin is what gives you that crackling texture. I prefer thighs over breasts here because they handle the heat better and stay tender. Look for thighs with the skin still attached and intact—torn skin won’t crisp as evenly.
- Salt (1 teaspoon / 5 g): I use kosher salt for its clean flavor and easy pinchability. It helps draw moisture out of the skin, which is the first step toward getting it crispy. Don’t skip this—salting ahead makes a real difference.
- Black pepper (½ teaspoon / 1 g): Freshly ground is best. It adds a subtle heat that balances the sweetness of the honey.
- Garlic powder (½ teaspoon / 1.5 g): This might seem redundant with the fresh garlic in the glaze, but trust me—it adds a savory depth that fresh garlic alone can’t provide. It’s like a flavor foundation.
For the Honey Garlic Glaze
- Honey (¼ cup / 85 g): Use a good-quality honey here—it’s the star of the show. The honey caramelizes in the oven, creating that sticky, golden coating. I prefer a mild honey like clover or orange blossom so the garlic flavor doesn’t get overpowered. Avoid honey that’s crystallized or too thick; it won’t spread evenly.
- Low-sodium soy sauce (3 tablespoons / 45 ml): This brings the salty, umami backbone that keeps the dish from being one-note sweet. Low-sodium is important here because the glaze reduces as it cooks, and regular soy sauce can make it too salty. If you’re gluten-free, tamari or coconut aminos work beautifully.
- Fresh garlic (4-5 cloves, minced): Please use fresh garlic here—not the jarred stuff. Fresh garlic has a pungent, almost spicy quality that mellows into something sweet and nutty as it bakes. I’ve tried this with pre-minced garlic and it just doesn’t hit the same. The flavor is flat and somehow more bitter.
- Rice vinegar (1 tablespoon / 15 ml): This brightens the glaze and cuts through the richness of the chicken. It’s a small amount, but you’ll notice the difference if you skip it. Apple cider vinegar works as a substitute in a pinch.
- Sesame oil (1 teaspoon / 5 ml): Just a touch for that toasty, nutty finish. It rounds out the flavor profile and adds a subtle complexity that makes the dish feel more polished. Don’t use toasted sesame oil if you’re sensitive to strong flavors—regular sesame oil is milder.
- Cornstarch (1 teaspoon / 3 g): This is my secret weapon for getting the glaze to cling to the chicken instead of sliding off. Mixed with a little water to make a slurry, it thickens the glaze just enough to coat every ridge and crevice.
For Garnish (Optional but Recommended)
- Sesame seeds (1 tablespoon / 9 g): Toasted white or black sesame seeds add a nice visual contrast and a little nutty crunch.
- Green onions (2-3, sliced): Fresh green onions add a pop of color and a mild oniony bite that cuts through the richness.
- Red pepper flakes (optional): A pinch for heat, if that’s your thing.
Equipment Needed
You don’t need a professional kitchen to nail this recipe. Here’s what you’ll actually use:
- Baking sheet or rimmed sheet pan: A rimmed pan is crucial—without the rim, the glaze will drip off and burn on the bottom of your oven. I use a half-sheet pan (13×18 inches) because it gives the thighs plenty of space to crisp without steaming each other. If you’re using a smaller pan, make sure the thighs aren’t touching.
- Wire rack (fits inside the baking sheet): This is the real secret to crispy skin. Elevating the chicken allows hot air to circulate underneath, so the bottom gets crispy too instead of sitting in a puddle of rendered fat. If you don’t have a wire rack, you can still get good results—just flip the thighs halfway through and pat them dry before flipping.
- Small saucepan: For simmering the glaze. A 1-quart saucepan is perfect. Non-stick is nice here because the honey can get sticky.
- Mixing bowl: For tossing the chicken with the glaze before baking. Any medium bowl works.
- Tongs: For flipping the chicken and transferring it to the serving plate. Silicone-tipped tongs won’t scratch your pan.
- Pastry brush (optional): For brushing the glaze onto the chicken during the last few minutes of baking. A spoon works too, but a brush gives you more even coverage.
- Instant-read thermometer: If you want to be absolutely sure your chicken is done without overcooking it. Chicken thighs should reach 165°F (74°C) at the thickest part, but honestly, I pull mine at 160°F because carryover cooking takes it the rest of the way.
I’ve made this recipe with and without the wire rack, and the difference is noticeable. If you’re on a budget, you can skip the rack and just flip the thighs halfway through—you’ll still get good results, just not quite as crispy on the bottom. The baking sheet itself is worth investing in if you bake often. A sturdy, heavy-duty sheet pan distributes heat more evenly and won’t warp in the oven.
Preparation Method
Let’s get cooking. I’ve broken this down into clear steps so you can follow along without any guesswork. Take your time with the first step—it makes a bigger difference than you think.
Step 1: Prep the Chicken (5 minutes)
Take your chicken thighs out of the fridge about 15 minutes before you start. This takes the chill off and helps them cook more evenly. Pat each thigh dry with paper towels—really dry. This is the most important step for crispy skin. If the skin is even slightly damp, it will steam instead of crisp. I usually go through three or four paper towels for a full batch.
Season both sides generously with salt, pepper, and garlic powder. Don’t be shy with the salt—it not only seasons the meat but also helps draw out moisture from the skin, which is exactly what you want. Let the seasoned thighs sit at room temperature while you preheat the oven and make the glaze.
Step 2: Preheat the Oven (5 minutes)
Set your oven to 425°F (220°C). This high heat is what gives you that crackling skin. While the oven heats up, place a wire rack inside your baking sheet. If you don’t have a rack, line the baking sheet with aluminum foil for easier cleanup—just know the bottom of the chicken won’t get as crispy.
Step 3: Make the Glaze (10 minutes)
In a small saucepan, combine the honey, soy sauce, minced garlic, rice vinegar, and sesame oil. Whisk everything together and bring it to a gentle simmer over medium heat. Let it bubble for about 3-4 minutes, stirring occasionally, until it thickens slightly and the garlic becomes fragrant. You’ll notice the color darken and the texture become more syrupy.
In a small bowl, mix the cornstarch with 1 tablespoon of cold water until smooth. Pour this slurry into the simmering glaze while whisking constantly. The glaze will thicken almost immediately—keep whisking for about 30 seconds, then remove it from the heat. Set it aside to cool slightly. It will continue to thicken as it cools.
Step 4: Coat the Chicken (5 minutes)
Place the seasoned chicken thighs in a mixing bowl. Pour about two-thirds of the glaze over them (reserve the rest for later). Use your hands or tongs to toss and coat each thigh evenly. Make sure every piece gets a good layer of glaze—this is what will caramelize into that beautiful golden crust.
Arrange the glazed thighs on the wire rack, skin side up, leaving at least an inch of space between each piece. Crowding the pan will trap steam and prevent the skin from crisping. If you have to squeeze them in, use a second baking sheet.
Step 5: Bake (20-25 minutes)
Place the baking sheet on the middle rack of your preheated oven. Bake for 15 minutes without opening the door. This is the hardest part—I know you want to check, but every time you open the oven, you let out heat and steam, which works against the crisping process.
After 15 minutes, pull the pan out and brush each thigh with the reserved glaze. Return the pan to the oven and bake for another 5-10 minutes, until the skin is deep golden brown and bubbling. The glaze should look sticky and caramelized, not burnt. If you’re using an instant-read thermometer, the internal temperature should read 165°F (74°C) at the thickest part of the thigh.
Step 6: Rest and Serve (5 minutes)
Let the chicken rest on the rack for 5 minutes before serving. This allows the juices to redistribute and the glaze to set. If you skip this step, the glaze will slide right off and the meat will release its juices onto the plate instead of staying inside the thigh.
Transfer the thighs to a serving platter, spoon any remaining glaze from the pan over the top, and garnish with sesame seeds and sliced green onions. Serve immediately while the skin is still crackling.
Cooking Tips & Techniques
After making this recipe more times than I’ll admit, I’ve collected a few hard-won lessons. Here’s what I wish I’d known from the beginning.
Don’t skip the drying step. I learned this the hard way. The first time I made these, I patted the chicken quickly with one paper towel and called it good. The skin came out leathery and sad. Moisture is the enemy of crispiness. Take the extra minute to really dry each thigh—you’ll taste the difference.
Watch the glaze carefully. Honey burns faster than you think. During my second attempt, I got distracted and let the glaze simmer too long. It turned dark and bitter, and the whole batch tasted like burnt sugar. Keep the heat at medium and stir frequently. If you see the glaze starting to darken too much, pull it off the heat immediately.
Use a wire rack. This single change transformed my results. Without the rack, the bottom of the chicken sits in rendered fat and glaze, which makes it soggy. With the rack, air circulates all around, and you get crispy skin on top and bottom. If you don’t have a rack, flip the thighs halfway through baking and pat the bottom dry before flipping.
Let the chicken rest. I know it’s tempting to dig in right away, but that 5-minute rest is crucial. The glaze needs time to set, and the juices need time to settle. If you cut into the chicken immediately, you’ll lose all that moisture onto the cutting board. Trust me on this one—I’ve made the mistake more than once.
Double the glaze if you like extra sauce. The recipe as written gives you enough for a nice coating, but if you’re a sauce person (I am), make a double batch. Simmer the extra glaze separately and drizzle it over rice or vegetables alongside the chicken.
Variations & Adaptations
This recipe is forgiving and adaptable. Here are some ways to make it your own:
- Spicy Honey Garlic: Add 1-2 teaspoons of sriracha or red pepper flakes to the glaze for a sweet-heat combo that’s absolutely addictive. I’ve made this version for game day and it disappears fast—it pairs perfectly with our easy buffalo chicken meatballs for a spicy chicken spread.
- Gluten-Free Version: Swap the soy sauce for tamari or coconut aminos. Everything else in the recipe is naturally gluten-free. I’ve tested this with tamari and the flavor is nearly identical—just slightly less salty, so you might want to add an extra pinch of salt to the chicken.
- Honey Garlic Chicken Thighs with Vegetables: Add chopped broccoli, bell peppers, or snap peas to the baking sheet during the last 10 minutes of cooking. Toss them in a little olive oil and salt first. The vegetables roast in the rendered chicken fat and pick up some of the glaze—it’s a complete meal on one pan. If you love sheet pan dinners, you’ll also enjoy our easy maple dijon sheet pan chicken thighs for another one-pan option.
- Air Fryer Adaptation: Cook the glazed thighs in an air fryer at 400°F (200°C) for 18-20 minutes, flipping halfway through. The air fryer gets the skin even crispier than the oven, if you can believe it. Just make sure not to overcrowd the basket.
- Lemon Herb Variation: Add the zest of one lemon and 1 teaspoon of dried thyme to the glaze. The lemon brightens the sweetness and the thyme adds an earthy note. This version is especially good served over rice with a squeeze of fresh lemon juice on top.
Serving & Storage Suggestions
These crispy honey garlic baked chicken thighs are incredibly versatile. Here’s how to serve them and what to do with leftovers.
Serving Temperature and Presentation: Serve the chicken hot out of the oven while the skin is still crackling. Arrange the thighs on a platter, drizzle any remaining glaze from the pan over the top, and garnish with sesame seeds and sliced green onions. The contrast of the dark, glossy chicken against the bright green onions is gorgeous.
What to Serve With It: These thighs pair beautifully with steamed jasmine rice or coconut rice—the starch soaks up the extra glaze. For a lighter option, serve them with a simple green salad dressed with a tangy vinaigrette to cut through the richness. Roasted broccoli, green beans, or asparagus also work well. If you’re in the mood for something cozy, try serving them alongside our cozy crockpot pumpkin chili with black beans for a hearty fall dinner spread.
Storage Instructions: Store leftover chicken in an airtight container in the refrigerator for up to 4 days. The skin will lose its crispiness as it sits, but the flavor will actually deepen overnight. To reheat, place the thighs on a wire rack over a baking sheet and warm them in a 375°F (190°C) oven for 8-10 minutes. This restores some of the crispiness. Avoid microwaving—it makes the skin rubbery.
Freezing Instructions: These freeze well for up to 3 months. Let the chicken cool completely, then wrap each thigh individually in plastic wrap and place them in a freezer-safe bag. To reheat, thaw overnight in the refrigerator and warm in the oven as described above. The glaze might separate slightly during freezing, but it will come back together in the oven.
How Flavors Develop Over Time: The honey-garlic flavor actually gets better after a day in the fridge. The garlic mellows and the honey soaks deeper into the meat. If you’re meal prepping, make a double batch and eat the leftovers the next day—they’re even better.
Nutritional Information & Benefits
Here’s the approximate nutritional breakdown for one serving (2 chicken thighs, based on a 6-thigh recipe):
- Calories: 420
- Protein: 32 g
- Fat: 24 g
- Saturated Fat: 6 g
- Carbohydrates: 18 g
- Sugar: 16 g
- Sodium: 680 mg
- Fiber: 0 g
These values are estimates and will vary based on the exact ingredients and portion sizes you use.
Health Benefits: Chicken thighs are an excellent source of high-quality protein, which supports muscle repair and keeps you feeling full longer. They’re also rich in B vitamins, particularly B6 and B12, which help with energy metabolism. The skin contains healthy fats that aid in the absorption of fat-soluble vitamins.
Dietary Considerations: This recipe is naturally gluten-free when using tamari instead of soy sauce. It’s also low-carb friendly—with only 18 grams of carbs per serving, most of which come from the honey. If you’re watching your sugar intake, you can reduce the honey to 3 tablespoons without sacrificing too much flavor.
Potential Allergens: This recipe contains soy (soy sauce) and sesame (sesame oil). For a soy-free version, use coconut aminos. For a sesame-free version, substitute the sesame oil with avocado oil and skip the sesame seed garnish.
I love that this recipe feels indulgent but is actually quite balanced. You get the satisfaction of crispy, sticky chicken without the deep-frying or heavy breading. It’s the kind of dinner that makes you feel good about what you’re eating—and that’s a win in my book.
Conclusion
This crispy honey garlic baked chicken thighs recipe is the kind of dish that makes you wonder why you ever bothered with takeout. It’s fast enough for a busy weeknight, impressive enough for company, and simple enough that you’ll find yourself making it on repeat—just like I did.
The combination of shatteringly crispy skin, juicy meat, and that sticky-sweet-savory glaze is hard to beat. And the best part? You can tweak it endlessly to suit your taste. Add heat, go gluten-free, throw in some vegetables—it all works. This recipe is forgiving and flexible, which is exactly what a good weeknight dinner should be.
I’d love to hear how yours turn out. Did you add a spicy kick? Serve it with something unexpected? Drop a comment below and let me know—I read every single one. And if you’re looking for more quick, satisfying dinners, check out our quick meal prep chicken and broccoli bowls for another 30-minute option that’s perfect for busy weeks.
Now go make some crispy, sticky, glorious chicken. You’ve got this.
Frequently Asked Questions
Can I use chicken breasts instead of thighs?
You can, but the results won’t be the same. Chicken breasts cook faster and dry out more easily at the high temperature needed for crispy skin. If you want to try it, use bone-in, skin-on breasts and reduce the cooking time by about 5-7 minutes. Check the internal temperature—breasts are done at 165°F (74°C). For a reliable chicken breast recipe, try our crispy baked chicken breast tenders for a similar vibe.
Why is my chicken skin not crispy?
Most likely, the skin wasn’t dry enough before cooking, or the chicken was crowded on the pan. Pat the thighs completely dry with paper towels before seasoning, and make sure there’s space between each piece on the baking sheet. Using a wire rack also makes a huge difference—it lets air circulate underneath so the bottom gets crispy too.
Can I make the glaze ahead of time?
Absolutely. Make the glaze up to 3 days in advance and store it in an airtight container in the refrigerator. When you’re ready to use it, warm it gently on the stovetop or in the microwave, stirring occasionally. If it’s too thick after refrigeration, add a splash of water to thin it out.
How do I prevent the glaze from burning?
Watch the glaze carefully while it simmers—honey burns quickly. Keep the heat at medium and stir frequently. If the glaze starts to darken too much, remove it from the heat immediately. When brushing the glaze onto the chicken during baking, apply it during the last 5-10 minutes so it caramelizes without burning.
Can I double this recipe?
Yes, but use two baking sheets instead of one. Crowding the pan will cause the chicken to steam instead of crisp, and you’ll lose that beautiful crackling skin. Rotate the pans halfway through baking for even cooking. You might need to add a few extra minutes to the total cooking time if your oven struggles to maintain temperature with two pans inside.
Pin This Recipe!

Crispy Honey Garlic Baked Chicken Thighs: Easy 30-Minute Recipe

Crispy, sticky, and savory-sweet honey garlic baked chicken thighs ready in under 30 minutes. Perfect for busy weeknights, this recipe delivers shatteringly crispy skin without deep frying.
- Prep Time: 10 minutes
- Cook Time: 25 minutes
- Total Time: 35 minutes
- Yield: 4 servings 1x
- Category: Main Course
- Cuisine: Asian-Inspired
Ingredients
- 6–8 bone-in, skin-on chicken thighs (about 2.5 lbs / 1.1 kg)
- 1 teaspoon kosher salt (5 g)
- ½ teaspoon black pepper, freshly ground (1 g)
- ½ teaspoon garlic powder (1.5 g)
- ¼ cup honey (85 g)
- 3 tablespoons low-sodium soy sauce (45 ml)
- 4–5 cloves garlic, minced
- 1 tablespoon rice vinegar (15 ml)
- 1 teaspoon sesame oil (5 ml)
- 1 teaspoon cornstarch (3 g)
- 1 tablespoon cold water (for slurry)
- 1 tablespoon sesame seeds, toasted (9 g, optional for garnish)
- 2–3 green onions, sliced (optional for garnish)
- Red pepper flakes (optional for garnish)
Instructions
- Take chicken thighs out of fridge 15 minutes before starting. Pat each thigh dry with paper towels (use 3-4 towels). Season both sides generously with salt, pepper, and garlic powder. Let sit at room temperature.
- Preheat oven to 425°F (220°C). Place a wire rack inside a rimmed baking sheet. If no rack, line sheet with foil.
- In a small saucepan, combine honey, soy sauce, minced garlic, rice vinegar, and sesame oil. Whisk and bring to a gentle simmer over medium heat. Cook 3-4 minutes, stirring occasionally, until slightly thickened and fragrant.
- In a small bowl, mix cornstarch with 1 tablespoon cold water until smooth. Pour slurry into simmering glaze while whisking constantly. Cook 30 seconds, then remove from heat. Set aside to cool slightly.
- Place seasoned chicken thighs in a mixing bowl. Pour about two-thirds of the glaze over them. Toss to coat evenly. Arrange glazed thighs on the wire rack, skin side up, leaving at least 1 inch between pieces.
- Bake on middle rack for 15 minutes without opening the oven door. After 15 minutes, brush each thigh with reserved glaze. Return to oven and bake 5-10 more minutes until skin is deep golden brown and internal temperature reaches 165°F (74°C).
- Let chicken rest on rack for 5 minutes before serving. Transfer to platter, spoon any remaining glaze from pan over top, and garnish with sesame seeds and sliced green onions. Serve immediately.
Notes
Pat chicken thighs very dry for crispiest skin. Use a wire rack to allow air circulation. Watch glaze carefully to prevent burning. Let chicken rest 5 minutes before serving. Double the glaze if you like extra sauce.
Nutrition
- Serving Size: 2 chicken thighs
- Calories: 420
- Sugar: 16
- Sodium: 680
- Fat: 24
- Saturated Fat: 6
- Carbohydrates: 18
- Protein: 32
Keywords: honey garlic chicken, baked chicken thighs, crispy chicken, 30-minute dinner, weeknight dinner, chicken recipe, easy dinner


