Third time in as many days, and this time I caught myself licking chocolate off my thumb before the truffles had even set. That’s when you know a recipe has you. These Easy Black Cat Oreo Truffle Pops weren’t supposed to be a whole thing—I was just trying to use up a half-eaten sleeve of Oreos after a late-night snack session. But one batch turned into another, and somewhere between the third dip in dark chocolate and the fourth attempt at getting those candy eyes to stick straight, I realized I was making Halloween treats at 11 PM on a Tuesday. Not because I had to. Because I genuinely couldn’t stop. There’s something about the way the filling binds with the crushed cookies—it turns into this fudgy, almost truffle-like center that feels way more indulgent than it should for something so simple. And the black cat shape? Honestly, it’s just cute enough to make people smile without being fussy. These aren’t the kind of Halloween desserts that require a steady hand or a pastry degree. They’re the kind that make you feel like you pulled off something clever, even if you’re just pressing Oreo crumbs together in a bowl while watching Hocus Pocus.
Why You’ll Love This Recipe
I’ve tested this recipe more times than I care to admit—partly for science, partly because I kept eating the test batches. What I love most is how forgiving it is. You don’t need a candy thermometer or any special equipment. The truffle base comes together in about ten minutes, and the hardest part is waiting for the chocolate to set.
- No-Bake & Quick: These come together in under 30 minutes of active time. Perfect for last-minute Halloween party prep or a fun afternoon project with kids.
- Simple Ingredients: You only need Oreos, cream cheese, chocolate melts, and a few candy decorations. No fancy baking supplies required.
- Perfect for Halloween: The black cat design is instantly recognizable and festive without being overly complicated. They’re a hit at Halloween parties, classroom treats, or just a spooky snack at home.
- Crowd-Pleaser: I’ve brought these to three different gatherings now, and every single person asked for the recipe. Kids love them, adults pretend they’re too sophisticated but then eat three.
- Unbelievably Delicious: The texture is what gets you—creamy, fudgy center with a snappy chocolate shell. It’s like a dressed-up Oreo truffle that somehow tastes even better than the original.
What sets this recipe apart from other Oreo truffle recipes online is the ratio. I spent a few batches tweaking the cream cheese amount until the filling was firm enough to hold a lollipop stick but still soft and melt-in-your-mouth. Plus, the black cat design is genuinely doable for anyone—no piping bags or fondant required.
What Ingredients You Will Need
This recipe uses simple, store-bought ingredients that come together to create something that looks way more impressive than it should. Most of these are pantry staples if you do any kind of holiday baking.
- Oreo cookies (regular, not double-stuf): One standard 14.3-ounce package works perfectly. You’ll use the whole cookie—cream filling and all. I recommend the classic Oreo for the best texture. The double-stuf version makes the filling too soft to hold its shape on a stick.
- Cream cheese (full-fat, softened): You need exactly 8 ounces, at room temperature. Low-fat cream cheese makes the truffle mixture too sticky and less stable. Let it sit out for about 30 minutes before mixing. I prefer Philadelphia brand for consistent results.
- Dark chocolate melting wafers: About 12 ounces. I use Ghirardelli dark chocolate melting wafers because they melt smoothly and set with a nice shine. You can also use semi-sweet chocolate chips mixed with a teaspoon of coconut oil to thin them out.
- Orange candy melts: A small amount—about 2 ounces—for the cat eyes. Wilton brand works well. You can also use white chocolate melts tinted with orange gel food coloring.
- Black sanding sugar or edible glitter (optional): For adding a little sparkle to the cats. Totally optional but adds a fun touch.
- Candy eyes (small, round): These are the little white and black candy eyes you find in the baking aisle. They come in different sizes—go for the small ones (about 6mm) so they fit on the truffle pops.
- Lollipop sticks: Standard 6-inch sticks work best. You can find them at craft stores or online. If you don’t have sticks, you can skip them and just serve the truffles as balls.
- Pink or red candy melts (optional): For making tiny noses. I sometimes use a small dot of pink icing instead.
Equipment Needed
You don’t need much for this recipe, which is part of the appeal. Here’s what I used across my many test batches:
- Food processor: For crushing the Oreos into fine crumbs. A blender works too, but a food processor gives you more control. If you don’t have either, put the cookies in a zip-top bag and crush them with a rolling pin—just make sure the crumbs are uniform.
- Large mixing bowl: For combining the cookie crumbs and cream cheese. A glass or stainless steel bowl works best.
- Electric hand mixer: Not strictly necessary, but it makes combining the cream cheese and crumbs much easier. You can do it by hand with a sturdy spatula if you don’t mind a little arm workout.
- Baking sheet lined with parchment paper: For setting the truffles. Make sure it fits in your freezer.
- Small microwave-safe bowls: For melting the chocolate and candy melts. Glass measuring cups work great because they have pour spouts.
- Styrofoam block or cardboard box: For holding the pops upright while the chocolate sets. I’ve used a shoebox with holes poked in it more times than I can count.
- Toothpicks: For applying the candy eyes and noses. A steady hand helps, but toothpicks make it easier.
Preparation Method
- Crush the Oreos: Place the entire package of Oreos (cream filling and all) into your food processor. Pulse until you have fine, even crumbs. You want them to look like dark sand—no large chunks. This takes about 30 seconds. If using a bag and rolling pin, make sure to crush thoroughly.
- Soften the cream cheese: Take your cream cheese out of the fridge about 30 minutes before starting. It should be soft enough that a finger pressed into it leaves a slight indent. Do not microwave it—warm cream cheese makes the mixture too soft.
- Mix the truffle base: In a large bowl, combine the Oreo crumbs and softened cream cheese. Use a hand mixer on low speed or a spatula to mix until fully combined. The mixture should look like a thick, uniform dough. If it feels too sticky, add a few more crushed Oreos. If it feels too dry, add a teaspoon of cream cheese.
- Chill the mixture: Cover the bowl with plastic wrap and refrigerate for at least 30 minutes. This step is crucial—the mixture needs to firm up so you can roll it into balls. I’ve skipped this step before, and the truffles were a sticky mess.
- Form the truffle balls: Scoop out about 1 tablespoon of the chilled mixture and roll it into a smooth ball. You should get about 20 to 24 balls. Place them on the parchment-lined baking sheet. If the mixture starts to warm up and get sticky, pop it back in the fridge for 10 minutes.
- Insert the sticks: Gently push a lollipop stick into each ball, about halfway through. Don’t push all the way to the other side—you want the stick to be secure but not poking out. Place the pops back on the baking sheet and freeze for 15 minutes. This helps the chocolate coating stick better.
- Melt the dark chocolate: Place the dark chocolate melting wafers in a microwave-safe bowl. Microwave in 30-second intervals, stirring after each, until smooth. Be careful not to overheat—chocolate seizes up if it gets too hot. Stir until completely smooth.
- Dip the pops: Take the pops out of the freezer. Holding the stick, dip each truffle into the melted chocolate, covering it completely. Let any excess drip off back into the bowl. You can gently tap the stick against the bowl to help the chocolate settle. Place the dipped pop into your Styrofoam block or cardboard box to set.
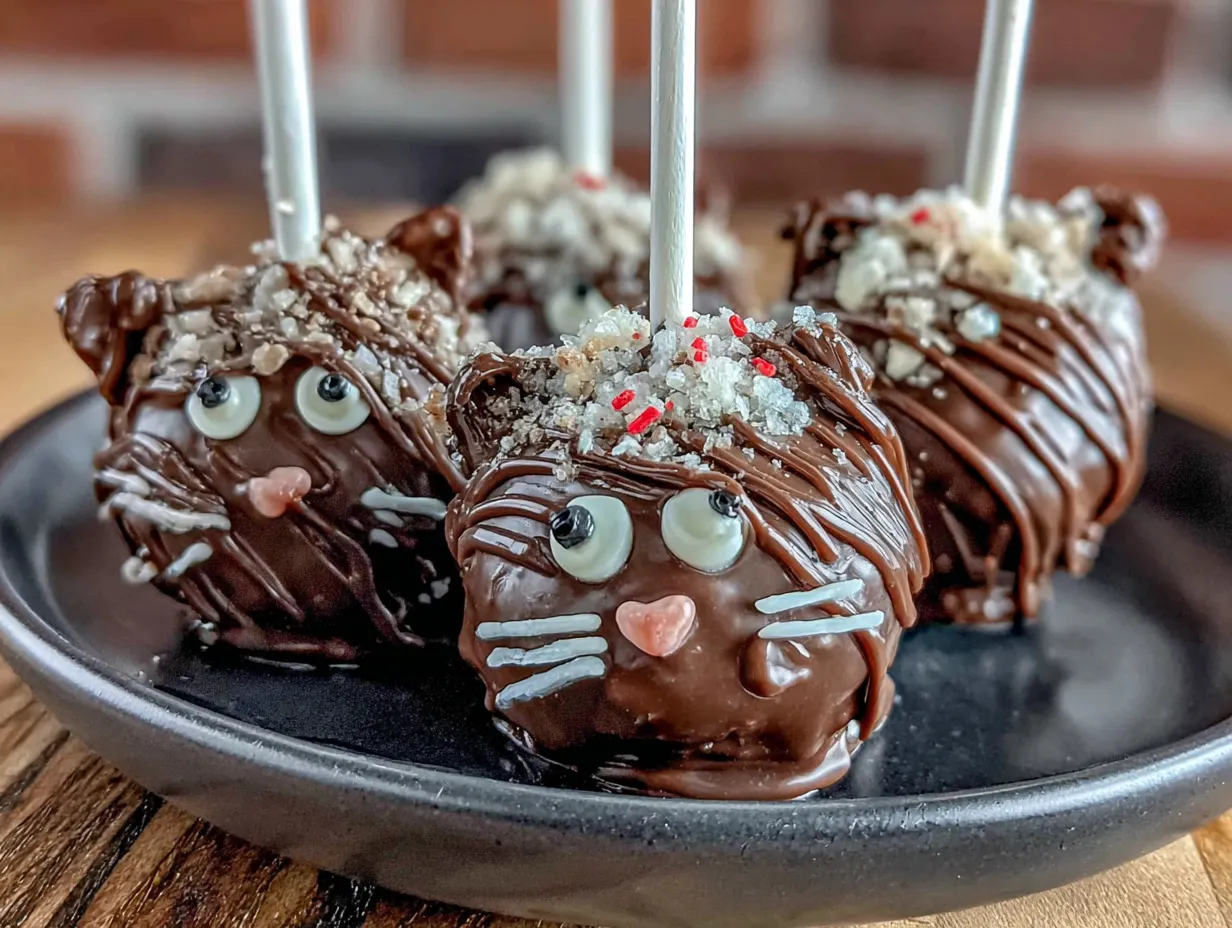
- Add the cat features while chocolate is wet: Before the chocolate sets (within about 30 seconds), use a toothpick to place two small candy eyes on each pop. For the ears, I use two small triangles cut from a black candy melt or just leave them as round truffles with faces—both look cute.
- Melt the orange candy melts: In a separate small bowl, melt the orange candy melts following the same microwave method. Use a toothpick to dab a small amount of orange on the sides of the truffle for ears, or just skip this step if you prefer a simpler look.
- Let the pops set completely: Allow the chocolate to harden at room temperature or in the fridge. Room temperature takes about 20 minutes; the fridge takes about 10. Don’t rush this step—if the chocolate isn’t fully set, the pops will smudge when you handle them.
- Add final details: Once the chocolate is set, you can add tiny noses using pink candy melt or a small dot of icing. I use a toothpick for precision. Optionally, sprinkle a little black sanding sugar over the pops while the chocolate is still tacky for a sparkly effect.
Cooking Tips & Techniques
I learned a few things the hard way so you don’t have to. First batch? I didn’t chill the mixture long enough, and the truffles fell apart as soon as I tried to dip them. Second batch? I used double-stuf Oreos, and the filling was too soft—the pops slid right off the sticks. Third time was the charm.
Don’t skip the freeze step: Freezing the formed truffle balls for 15 minutes before dipping makes a huge difference. The cold truffle helps the chocolate set faster, which means less dripping and a cleaner finish. If you’re working in a warm kitchen, this is non-negotiable.
Thin your chocolate if needed: If your melted chocolate seems too thick for dipping, add a teaspoon of coconut oil or vegetable shortening and stir until smooth. This gives you a thinner coating that sets with a nice shine. Just don’t add too much—a little goes a long way.
Work in small batches: Only take a few truffles out of the freezer at a time. If you take out all 24 at once, they’ll warm up before you get to them. I work in batches of 6—dip, decorate, set, repeat.
Use a Styrofoam block: I cannot stress this enough. Trying to balance wet truffle pops on a baking sheet is a disaster waiting to happen. A Styrofoam block or even a cardboard box with holes poked in it holds the pops upright while the chocolate sets. It saves so much frustration.
Fix mistakes quickly: If a candy eye slides out of place, use a toothpick to nudge it back within the first 10 seconds. After that, the chocolate starts to set, and you’ll have to wait until it hardens to fix it. Don’t panic—imperfect cats have character.
Variations & Adaptations
These truffle pops are surprisingly versatile. Here are a few ways I’ve adapted them for different occasions and dietary needs:
- Gluten-Free Version: Use gluten-free Oreos (yes, they exist!) and follow the same recipe. The texture is slightly different—a bit crumblier—but the taste is still fantastic.
- Vegan Version: Use vegan cream cheese and vegan chocolate wafers. I’ve tested this with Kite Hill cream cheese, and it works well. Just make sure to chill the mixture longer since vegan cream cheese tends to be softer.
- White Chocolate Cats: Swap the dark chocolate for white chocolate melts and use black candy melts for the cat features. It gives a totally different look—like ghost cats. Perfect if you’re making these for a non-Halloween event.
- Pumpkin Spice Twist: Add 1 teaspoon of pumpkin pie spice to the truffle mixture along with the cream cheese. It gives the pops a subtle fall flavor that pairs surprisingly well with the chocolate. I tried this last October and it was a hit.
- Mini Version: Roll the truffles into 1-teaspoon-sized balls instead of tablespoons. You’ll get about 40 mini pops. These are perfect for kids’ parties or as cupcake toppers.
Serving & Storage Suggestions
These pops look best when served at room temperature. The chocolate shell snaps when you bite into it, and the filling is soft and creamy. If you serve them straight from the fridge, the filling will be a bit firmer—still delicious, but not as luxurious.
For presentation, I like to arrange them standing up in a small pumpkin-shaped bowl or a mason jar filled with candy corn. They also look great arranged on a platter alongside spiderweb sugar cookie bars for a full Halloween dessert spread.
Storage: Keep the pops in an airtight container in the refrigerator for up to 5 days. Layer them between sheets of parchment paper so the chocolate doesn’t stick together. If you’ve added candy eyes, they might soften slightly after a day or two, but the pops will still taste great.
Freezing: You can freeze the undipped truffle balls for up to 3 months. Just place them on a baking sheet, freeze until solid, then transfer to a freezer bag. When you’re ready to serve, thaw them in the fridge overnight, then dip and decorate as directed. I do this all the time for holiday prep.
Reheating tip: If the chocolate coating gets a little dull after refrigeration, let the pops sit at room temperature for 10 minutes before serving. The shine comes back as the chocolate warms slightly.
Nutritional Information & Benefits
Let’s be real—these are a treat, not a health food. But they’re made with real ingredients, and there are a few bright spots worth noting.
Each pop (based on 24 servings) contains approximately:
- Calories: 180
- Fat: 11g
- Carbohydrates: 20g
- Sugar: 14g
- Protein: 3g
- Fiber: 1g
The cream cheese adds a small amount of protein and calcium, while the dark chocolate provides a modest dose of antioxidants. Oreos are not exactly a superfood, but hey—it’s Halloween. Life’s too short to skip the treats.
For those with dietary concerns: these contain dairy, gluten, and soy. If you need a dairy-free option, see the vegan variation above. The sugar content is moderate for a dessert, but you can reduce it slightly by using sugar-free dark chocolate for the coating.
Conclusion
These Easy Black Cat Oreo Truffle Pops have officially become my go-to Halloween recipe. They’re the kind of treat that makes people light up when they see them—partly because they’re adorable, partly because they taste incredible. And the best part? You don’t need to be a professional baker to pull them off.
I love that I can make a batch in under an hour, even on a busy weeknight. I love that my kids can help roll the truffle balls and place the candy eyes. But mostly, I love that every time I bring these to a party, someone asks for the recipe. That never gets old.
If you make these, don’t stress about making them perfect. Some of my best batches were the ones where the cats looked a little lopsided or the chocolate dripped in funny places. That’s the charm of homemade treats—they have personality. So grab a sleeve of Oreos, put on your favorite spooky playlist, and get rolling. And when you’re done, come back and tell me how they turned out. I’d love to hear about your version.
Frequently Asked Questions
Can I make these without lollipop sticks?
Absolutely. Just roll the truffle mixture into balls and dip them in chocolate without the sticks. They’ll look like regular truffles, which are just as delicious. If you’re serving them at a party, you can place each one in a mini paper baking cup for a neat presentation.
Why did my truffle mixture turn out too sticky?
This usually happens if the cream cheese was too warm or if you used double-stuf Oreos. Try chilling the mixture for an additional 30 minutes before rolling. If it’s still too sticky after that, add a few more crushed Oreos to absorb the moisture.
Can I use white chocolate instead of dark chocolate?
Yes, white chocolate works great. Just keep in mind that white chocolate is sweeter and more prone to seizing when melted. Stir in a teaspoon of coconut oil to keep it smooth. For the black cat look, you can add black gel food coloring to the white chocolate, though it won’t be as dark as using actual dark chocolate.
How far in advance can I make these?
You can make the undipped truffle balls up to 3 months ahead and freeze them. Dip them the day before you plan to serve for the freshest look. Once dipped, they keep in the fridge for up to 5 days. I don’t recommend making them more than 2 days ahead if you’re serving them at a party—the candy eyes can soften over time.
My chocolate coating cracked after setting. What went wrong?
This usually means the chocolate was too thick when you dipped, or the truffle balls were too cold. Next time, let the frozen truffles sit at room temperature for 2-3 minutes before dipping. Also, make sure your melted chocolate is thin enough—add a teaspoon of coconut oil if needed. Cracks are purely cosmetic, though, so the pops will still taste fine.
Pin This Recipe!

Easy Black Cat Oreo Truffle Pops: Best Halloween Treat

These Easy Black Cat Oreo Truffle Pops are a no-bake Halloween treat with a fudgy Oreo and cream cheese center, dipped in dark chocolate and decorated as adorable black cats. Perfect for parties, they come together in under 30 minutes of active time and require no special equipment.
- Prep Time: 20 minutes
- Cook Time: 10 minutes
- Total Time: 1 hour 10 minutes (includes chilling and setting time)
- Yield: 20-24 servings 1x
- Category: Dessert
- Cuisine: American
Ingredients
- 1 (14.3-ounce) package Oreo cookies (regular, not double-stuf)
- 8 ounces full-fat cream cheese, softened
- 12 ounces dark chocolate melting wafers
- 2 ounces orange candy melts
- Black sanding sugar or edible glitter (optional)
- Small round candy eyes (about 6mm)
- 6-inch lollipop sticks
- Pink or red candy melts (optional)
Instructions
- Crush the Oreos: Place the entire package of Oreos (cream filling and all) into a food processor. Pulse until you have fine, even crumbs that look like dark sand, about 30 seconds.
- Soften the cream cheese: Take cream cheese out of the fridge about 30 minutes before starting. It should be soft enough that a finger pressed into it leaves a slight indent. Do not microwave.
- Mix the truffle base: In a large bowl, combine the Oreo crumbs and softened cream cheese. Use a hand mixer on low speed or a spatula to mix until fully combined into a thick, uniform dough. If too sticky, add more crushed Oreos; if too dry, add a teaspoon of cream cheese.
- Chill the mixture: Cover the bowl with plastic wrap and refrigerate for at least 30 minutes until firm.
- Form the truffle balls: Scoop out about 1 tablespoon of the chilled mixture and roll into a smooth ball. You should get about 20 to 24 balls. Place them on a parchment-lined baking sheet. If mixture gets sticky, return to fridge for 10 minutes.
- Insert the sticks: Gently push a lollipop stick into each ball, about halfway through. Place pops back on baking sheet and freeze for 15 minutes.
- Melt the dark chocolate: Place dark chocolate melting wafers in a microwave-safe bowl. Microwave in 30-second intervals, stirring after each, until smooth. Do not overheat.
- Dip the pops: Take pops out of freezer. Holding the stick, dip each truffle into melted chocolate, covering completely. Let excess drip off. Place dipped pop into a Styrofoam block or cardboard box to set.
- Add cat features while chocolate is wet: Within about 30 seconds, use a toothpick to place two small candy eyes on each pop. For ears, use small triangles cut from a black candy melt or leave as round truffles with faces.
- Melt the orange candy melts: In a separate small bowl, melt orange candy melts using the same microwave method. Use a toothpick to dab small amounts on sides for ears, or skip for a simpler look.
- Let pops set completely: Allow chocolate to harden at room temperature (about 20 minutes) or in the fridge (about 10 minutes).
- Add final details: Once chocolate is set, add tiny noses using pink candy melt or a small dot of icing with a toothpick. Optionally, sprinkle black sanding sugar over pops while chocolate is still tacky.
Notes
Don’t skip the freeze step before dipping—it helps the chocolate set faster and prevents dripping. If chocolate is too thick, add a teaspoon of coconut oil. Work in small batches of 6 pops at a time. Use a Styrofoam block to hold pops upright while setting. If candy eyes slide, nudge them back within 10 seconds.
Nutrition
- Serving Size: 1 pop
- Calories: 180
- Sugar: 14
- Sodium: 120
- Fat: 11
- Saturated Fat: 6
- Carbohydrates: 20
- Fiber: 1
- Protein: 3
Keywords: Halloween treats, Oreo truffles, black cat pops, no-bake dessert, easy Halloween recipe, Oreo truffle pops, spooky treats


