I have never been the mom with the perfectly themed Halloween party. You know the one—the Pinterest parent with the smoke machine in the driveway and the hand-stamped party favors. That is not me. I am the mom who forgets to buy candy until the day of and ends up handing out those weird orange-and-black wrapped things nobody actually wants. So when my kids started begging for a “spooky dinner” every October, I panicked a little. I tried the usual stuff—hot dogs wrapped to look like fingers, green eggs for some sort of Frankenstein thing—but honestly? It all felt like more work than the actual meal was worth.
Then I burned a meatloaf. Not badly—just enough to char the edges and make the kitchen smell like regret. I was about to toss it when my youngest walked in and said, “Whoa, it looks like a mummy.” And just like that, a happy accident turned into our family’s most-requested Halloween dinner. The crispy edges looked exactly like old, tattered bandages. I threw some spaghetti on the side for “worms,” and my kids acted like I had just handed them a treasure chest. That burnt meatloaf taught me something: sometimes the best recipes come from the mess-ups we almost throw away.
This Spooky One-Pan Mummy Meatloaf for Kids is that same energy—but on purpose this time. It is a simple, kid-friendly dinner that looks like it crawled out of a tomb but tastes like a cozy weeknight hug. And the best part? It all happens on one pan, which means less cleanup and more time to watch “Hocus Pocus” for the hundredth time. Honestly, this is the kind of recipe that makes you look like a Halloween hero without actually trying that hard. Let’s get into it.
Why You’ll Love This Recipe
Look, I have tested a lot of Halloween dinners. A lot. Some were cute but took two hours. Others were fast but looked like a sad science project. This mummy meatloaf is the sweet spot—it is genuinely easy, genuinely fun, and genuinely delicious. Here is why it works so well for busy families:
- One Pan, Zero Drama: The meatloaf and the “bandages” (which are just store-bought puff pastry or crescent roll dough) all bake together on a single sheet pan. You do not need a separate loaf pan, a baking sheet for sides, or a sink full of dishes. It is a one-pan wonder that makes cleanup a breeze, even on a chaotic school night.
- Kid-Approved and Adult-Friendly: This is not one of those “kids meals” that adults secretly hate. The meatloaf itself is juicy, savory, and seasoned just right—not too spicy, not too bland. The crispy dough “bandages” are basically buttery, flaky strips that even picky eaters devour. My husband, who claims he “doesn’t do themed food,” ate three slices.
- Customizable and Allergy-Friendly: You can swap the ground beef for ground turkey, chicken, or even a plant-based meat alternative. The dough bandages can be made with gluten-free puff pastry or dairy-free crescent dough if needed. This recipe is flexible enough to work for almost any dietary need without losing the fun factor.
- Perfect for Halloween Parties or School Nights: Whether you are hosting a spooky dinner party for the neighbor kids or just trying to make a Tuesday night feel special, this recipe delivers. It takes about 15 minutes of active prep time and then the oven does the rest. You can even prep the meatloaf shape and dough strips ahead of time and bake it when everyone is ready to eat.
- A Crowd-Pleaser That Actually Looks Scary: Let’s be real—kids eat with their eyes first. When they see a meatloaf wrapped in pale, crispy strips with little olive “eyes” staring back at them, they lose their minds. It is the perfect balance of spooky and silly, and it gets even the most reluctant eaters to the table without a fight.
What makes this recipe different from every other meatloaf out there is the texture. The dough bandages get golden and flaky while the meatloaf stays tender and moist. It is like a meatloaf wrapped in a warm, buttery blanket. And honestly? That is the kind of comfort food Halloween was made for.
What Ingredients You Will Need
This recipe uses simple, everyday ingredients to create something that looks complicated but is actually incredibly straightforward. Most of these are pantry staples, so you probably already have everything you need—except maybe the googly eyes (which are just pitted black olives, but we will get to that).
For the Meatloaf Base
- Ground beef (1.5 lbs / 680g): I recommend 80/20 ground beef for the juiciest meatloaf. Leaner blends work too, but you might need to add a little extra moisture. If you are using ground turkey or chicken, add an extra tablespoon of olive oil to keep it from drying out.
- Breadcrumbs (1 cup / 120g): Plain or Italian-style breadcrumbs both work great. Panko breadcrumbs will give you a lighter texture, while regular breadcrumbs make a denser, more traditional meatloaf. For a gluten-free option, use crushed pork rinds or almond flour.
- Milk (1/4 cup / 60ml): Whole milk adds richness, but any milk (including oat or almond milk) will work. The milk soaks into the breadcrumbs and keeps the meatloaf tender. Do not skip this—it makes a real difference.
- Large eggs (2): Eggs act as a binder, holding everything together. If you need an egg-free version, use 2 tablespoons of ground flaxseed mixed with 6 tablespoons of water (let it sit for 5 minutes to gel).
- Yellow onion (1/2 cup, finely diced / about 75g): Onion adds moisture and a subtle sweetness. Grate it instead of dicing if your kids are the type to pick out visible onion pieces. Trust me on this one.
- Garlic (2 cloves, minced): Fresh garlic is best, but 1 teaspoon of garlic powder works in a pinch. Garlic is non-negotiable in my house—it makes everything taste better.
- Worcestershire sauce (2 tablespoons / 30ml): This adds that deep, savory umami flavor that makes meatloaf taste like meatloaf. If you do not have Worcestershire, soy sauce or coconut aminos are good substitutes.
- Ketchup (3 tablespoons / 45ml): Ketchup adds sweetness and moisture. It also helps create that classic meatloaf glaze on top. You can use BBQ sauce instead for a smokier flavor.
- Salt (1 teaspoon) and black pepper (1/2 teaspoon): Simple seasoning that brings everything together. Adjust to your taste, but remember that the dough bandages will also add a little saltiness.
- Dried parsley (1 teaspoon): Optional, but it adds a little color and a subtle herbiness. Fresh parsley works too—use about 1 tablespoon, finely chopped.
For the Mummy Bandages
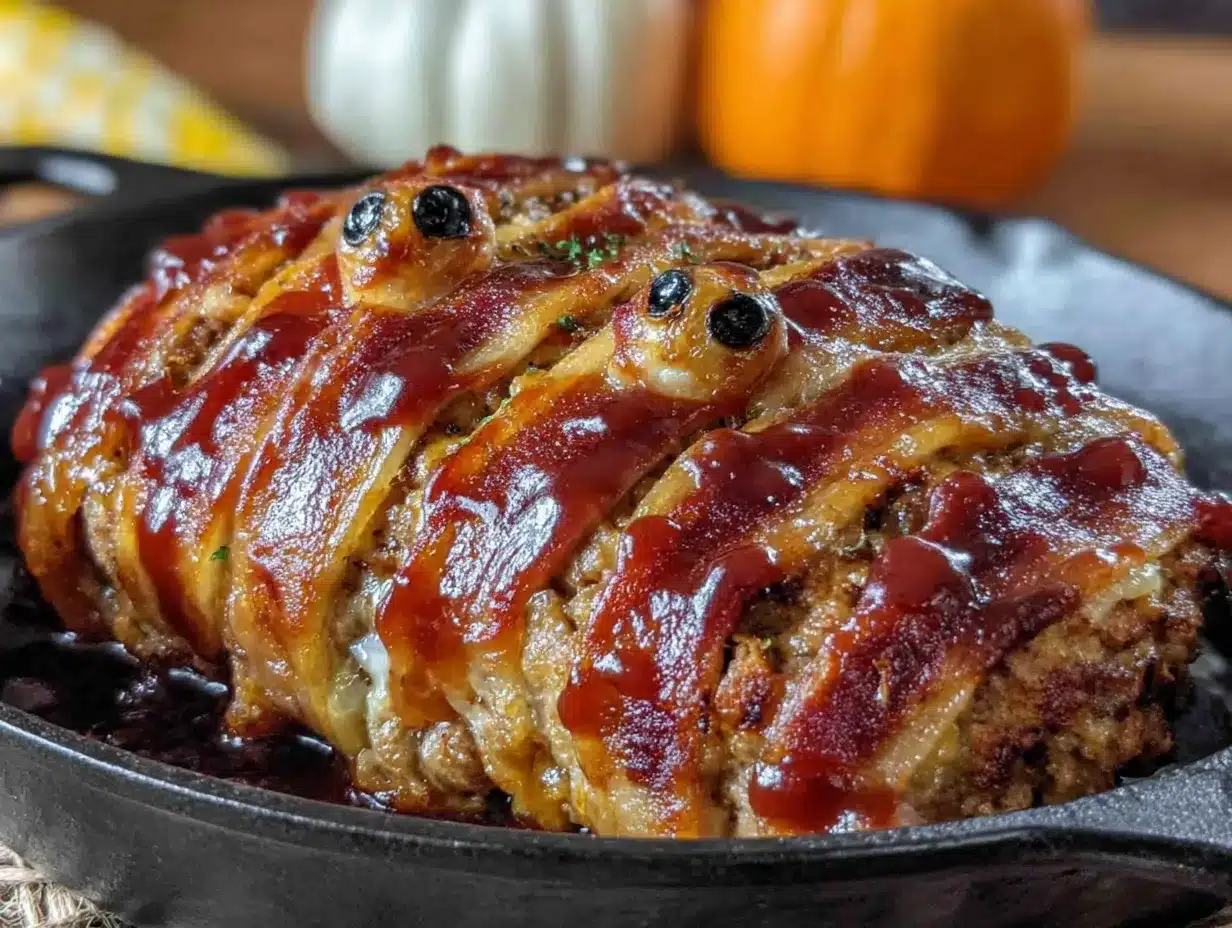
- Puff pastry sheets (1 sheet, thawed) OR crescent roll dough (1 can, 8 oz / 226g): This is what creates the mummy look. Puff pastry gives you a flakier, more buttery texture. Crescent roll dough is softer and a little sweeter. Both work beautifully. If you are gluten-free, use a gluten-free puff pastry (I like the brand Schär).
- Egg wash (1 egg + 1 tablespoon water, beaten): This gives the dough a golden, shiny finish. You can skip it if you are in a hurry, but the meatloaf will look paler and less “baked.”
For the Eyes and Decorations
- Pitted black olives (4-6, sliced into rounds): These become the mummy’s eyes. Use two slices per mummy (you will make two small meatloaves from this recipe). If your kids hate olives, use small rounds of cucumber or even candy eyes (just add them after baking so they do not melt).
- Ketchup or BBQ sauce (for serving, optional): A little pool of “blood” on the plate makes the presentation even more fun. My kids love dipping the mummy slices in it.
Ingredient Selection Tip: For the flakiest bandages, I always use Pepperidge Farm puff pastry sheets. They are widely available in the freezer section and bake up beautifully. If you are using crescent rolls, go with Pillsbury—they are reliable and easy to work with. Just make sure your dough is cold when you cut it; warm dough is sticky and hard to handle.
Equipment Needed
You do not need a lot of fancy gear for this recipe, which is part of why I love it. Here is what you will need:
- Large rimmed baking sheet (18×13 inches / 46×33 cm): A rimmed sheet pan is essential—it catches any drips from the meatloaf and keeps your oven clean. If you only have a smaller pan, just make one larger mummy instead of two small ones.
- Parchment paper or aluminum foil: Line your baking sheet for easy cleanup. Parchment paper is non-stick and makes lifting the meatloaf off the pan effortless. Foil works too, but spray it with non-stick cooking spray first.
- Large mixing bowl: For combining the meatloaf ingredients. Any big bowl works—I use my grandmother’s old ceramic one, but a stainless steel mixing bowl is fine.
- Sharp knife or pizza cutter: For cutting the dough into strips. A pizza cutter is faster and gives you cleaner edges, but a sharp knife works perfectly well.
- Pastry brush: For applying the egg wash. If you do not have one, use the back of a spoon or just your fingers (wash your hands first!).
- Small knife or kitchen shears: For cutting the olive slices. Kitchen shears are actually easier for this—just snip the olives into rounds.
- Measuring cups and spoons: Accuracy matters in meatloaf, especially with the liquid ingredients. Use proper measuring tools, not just eyeballing it.
Budget-Friendly Tip: Do not own a pastry brush? Neither did I for years. Just tear off a small piece of paper towel, dip it in the egg wash, and dab it onto the dough. It is not fancy, but it works every time.
Preparation Method
This recipe moves fast once you start, so read through everything before you begin. Trust me—I have learned the hard way that meatloaf does not like to be rushed.
- Preheat your oven to 375°F (190°C). Line a large rimmed baking sheet with parchment paper or foil. If using foil, spray it lightly with non-stick cooking spray. Set the pan aside while you prep the meatloaf.
- Make the meatloaf mixture. In a large mixing bowl, combine 1.5 lbs (680g) ground beef, 1 cup (120g) breadcrumbs, 1/4 cup (60ml) milk, 2 large eggs, 1/2 cup (75g) finely diced onion, 2 minced garlic cloves, 2 tablespoons (30ml) Worcestershire sauce, 3 tablespoons (45ml) ketchup, 1 teaspoon salt, 1/2 teaspoon black pepper, and 1 teaspoon dried parsley. Use your hands to mix everything together gently. Do not overmix—that is the number one mistake people make with meatloaf. Overmixing makes it tough and dense. Just combine until you do not see any more streaks of raw egg or breadcrumbs.
- Shape the meatloaves. Divide the mixture into two equal portions. On your prepared baking sheet, shape each portion into a log about 6 inches (15 cm) long and 2.5 inches (6 cm) wide. Make sure the ends are slightly rounded so they look more mummy-like. Leave at least 3 inches (7.5 cm) of space between the two logs—they will not expand much, but you want room for the dough bandages.
- Prepare the dough bandages. If using puff pastry, lightly flour your work surface and roll the sheet out slightly to about 1/8-inch (3 mm) thickness. If using crescent roll dough, unroll the sheet and press the perforations together to seal them. Using a sharp knife or pizza cutter, cut the dough into strips about 1/2-inch (1.25 cm) wide and 6-8 inches (15-20 cm) long. You will need about 12-16 strips total to cover both meatloaves.
- Wrap the mummies. Starting at one end of a meatloaf, drape a dough strip across the top, angling it slightly. Leave a small gap (about 1/2 inch / 1.25 cm) between each strip. Repeat with the remaining strips, overlapping them slightly at the edges to create a wrapped, bandaged look. Leave a small area at one end uncovered for the “face.” Repeat with the second meatloaf. Tuck the ends of the dough strips under the meatloaves so they stay in place during baking.
- Apply the egg wash. In a small bowl, beat 1 egg with 1 tablespoon of water. Using a pastry brush, gently brush the egg wash over all the exposed dough strips. This will give them a beautiful golden-brown color as they bake. Do not skip this step—it is what makes the mummies look like they have been wrapped in aged, crispy bandages.
- Bake the mummies. Place the baking sheet in the preheated oven and bake for 30-35 minutes, or until the internal temperature of the meatloaf reaches 160°F (71°C) when checked with an instant-read thermometer. The dough should be golden brown and puffed. If the dough starts browning too quickly (around the 20-minute mark), tent the pan loosely with aluminum foil for the remaining bake time.
- Add the eyes. Remove the baking sheet from the oven and let the mummies rest for 5 minutes. While they are still warm, press two olive slices into the uncovered “face” area of each meatloaf to create the eyes. The warmth of the meatloaf will help them stick. If you prefer, you can add the olives before baking—they will soften slightly but still look great.
- Serve and enjoy. Use a spatula to transfer each mummy to a serving platter or individual plates. Serve with a side of “spider web” mashed potatoes (just swirl a little sour cream on top) or “worm” spaghetti. A small bowl of ketchup for dipping is practically mandatory in my house. Watch your kids lose their minds—and then watch them eat every single bite.
Sensory Cue: When the meatloaf is done, the kitchen will smell like a cozy diner and a Halloween party had a baby. The dough will be puffed and golden, and the meatloaf will feel firm but spring back slightly when you press it. If you see any pink juices, it needs more time—pop it back in for another 5-7 minutes.
Cooking Tips & Techniques
I have made this recipe more times than I care to count, and I have definitely made every mistake in the book. Here is what I have learned so you do not have to repeat my errors:
- Do not overmix the meatloaf. I cannot say this enough. Mix just until the ingredients are combined. If you keep working it, the proteins in the meat tighten up and your meatloaf will be dense and dry. Think of it like making a burger patty—gentle hands, gentle mixing.
- Keep the dough cold. Puff pastry and crescent roll dough both work best when they are cold. If your kitchen is warm, pop the cut dough strips in the fridge for 10 minutes before wrapping the meatloaves. Cold dough puffs up better and holds its shape during baking. Warm dough gets sticky and flat—learned that one the hard way on a hot July day.
- Leave gaps between the bandages. I know it is tempting to wrap the meatloaf completely, but the gaps are what make it look like a mummy. If you cover the whole thing, it just looks like a dough-wrapped log (which is fine, but not spooky). Leave about 1/2 inch (1.25 cm) between each strip so the meatloaf peeks through.
- Use an instant-read thermometer. Meatloaf is one of those foods that can look done on the outside but still be undercooked in the middle. A thermometer takes the guesswork out of it. Insert it into the thickest part of the meatloaf, avoiding the dough. You are looking for 160°F (71°C) for beef.
- Let it rest before slicing. This is the hardest step because the kitchen smells amazing and everyone is hungry. But if you slice into it right away, the juices will run out and the meatloaf will be dry. Five minutes of resting time allows the juices to redistribute. Use that time to set the table or plate your sides.
My Biggest Failure: The first time I made this, I used a single giant meatloaf instead of two small ones. It took forever to bake, the dough burned on the outside before the meat was cooked through, and the whole thing was a disaster. Two smaller loaves cook faster and more evenly. Learn from my mistakes, friends.
Variations & Adaptations
This recipe is incredibly forgiving, so feel free to make it your own. Here are some of my favorite variations:
- Turkey or Chicken Mummy Meatloaf: Swap the ground beef for ground turkey or chicken. Add 2 tablespoons of olive oil or an extra egg to keep it moist since poultry is leaner. You might also want to add a little more salt and a pinch of smoked paprika for flavor.
- Vegetarian Mummy Meatloaf: Use a plant-based ground meat alternative (like Beyond Meat or Impossible Burger) in place of the beef. These products behave very similarly to real meat, so no other adjustments are needed. Just make sure your breadcrumbs and Worcestershire sauce are vegan (Lea & Perrins is not, but Annie’s makes a vegan version).
- Gluten-Free Mummy Meatloaf: Use gluten-free breadcrumbs or crushed pork rinds, and swap the puff pastry for a gluten-free version. Schär makes an excellent gluten-free puff pastry that bakes up beautifully. For crescent rolls, check the label—some brands offer gluten-free options.
- Spicy Mummy Meatloaf: Add 1-2 teaspoons of chili powder or a minced jalapeño to the meatloaf mixture. This is great for adults who want a little kick. My husband loves this version, though the kids usually stick with the original.
- Cheese-Stuffed Mummy Meatloaf: Before shaping the meatloaves, press a line of shredded mozzarella or cheddar cheese down the center of each portion. Wrap the meat around the cheese, then shape into logs. When you slice into the baked meatloaf, you will get a gooey, cheesy center that looks like mummy guts. My kids lose their minds over this version.
I have personally tried the cheese-stuffed version, and let me tell you—it is a game-changer. The melted cheese oozes out when you cut into the mummy, and my kids screamed with delight. Just make sure to seal the meat well around the cheese so it does not leak out during baking.
Serving & Storage Suggestions
This mummy meatloaf is best served warm, straight from the oven. The dough is at its flakiest and the meatloaf is at its juiciest. But it is also surprisingly good at room temperature, which makes it perfect for Halloween parties or potlucks.
- Serving Temperature: Serve the mummies warm, ideally within 10-15 minutes of coming out of the oven. If you are making them ahead for a party, you can bake them, let them cool slightly, and then reheat in a 300°F (150°C) oven for 10 minutes before serving.
- Presentation Ideas: Arrange the mummies on a large black platter or a wooden board for a spooky look. Add a small bowl of ketchup or BBQ sauce for dipping—call it “mummy blood” for extra fun points. You can also scatter some “spider” olives or “worm” spaghetti around the platter for a full Halloween spread.
- Complementary Dishes: Serve with mashed potatoes (swirl sour cream on top for a spider web effect), roasted vegetables like carrots and broccoli, or a simple green salad. For a truly spooky meal, pair it with our Easy No-Bake Halloween Oreo Truffle Eyeballs for dessert—they look like actual eyeballs and are ridiculously easy to make.
- Storage Instructions: Store leftover mummy meatloaf in an airtight container in the refrigerator for up to 4 days. The dough will soften slightly as it sits, but it is still delicious. To reheat, place slices on a baking sheet and warm in a 300°F (150°C) oven for 8-10 minutes. The microwave works too, but the dough will lose its crispiness.
- Freezer Instructions: You can freeze the baked, cooled meatloaf (without the olive eyes) for up to 3 months. Wrap it tightly in plastic wrap, then foil, and place in a freezer bag. Thaw overnight in the refrigerator and reheat in the oven. I do not recommend freezing the unbaked meatloaf with the dough—the dough gets soggy during thawing.
Flavor Development Note: Leftover mummy meatloaf actually tastes better the next day. The flavors meld together overnight, and the meatloaf becomes even more savory. My kids fight over the leftovers for lunch the next day—which, honestly, is the highest compliment a recipe can get.
Nutritional Information & Benefits
This recipe is comfort food through and through, but it does have some redeeming nutritional qualities. Here is a rough estimate per serving (based on 6 servings, using 80/20 ground beef and puff pastry):
- Calories: ~420 per serving
- Protein: 28g
- Fat: 24g
- Carbohydrates: 22g
- Fiber: 1g
- Sugar: 6g
- Sodium: 680mg
Health Benefits of Key Ingredients: Ground beef is an excellent source of iron, zinc, and B vitamins—especially B12, which is essential for energy and brain function. Onions and garlic are packed with antioxidants and have anti-inflammatory properties. Eggs provide high-quality protein and choline, which supports brain health. Even the puff pastry, while indulgent, provides a small amount of B vitamins from the enriched flour.
Dietary Considerations: This recipe contains gluten (from the breadcrumbs and dough) and dairy (from the milk and egg wash). For a gluten-free version, use gluten-free breadcrumbs and gluten-free puff pastry. For a dairy-free version, use unsweetened almond milk and skip the egg wash (or use a dairy-free alternative). The recipe is nut-free as written, making it safe for most school lunch policies.
My Personal Take: Look, I am not going to tell you this is a health food. It is meatloaf wrapped in pastry—it is supposed to be indulgent. But I feel good about serving it to my family because it is made with real, whole ingredients. There is no weird processed stuff, no artificial colors or flavors. Just good food that happens to look like it crawled out of a sarcophagus. And honestly? That is a win in my book.
Conclusion
This Spooky One-Pan Mummy Meatloaf for Kids is the recipe I wish I had when my kids were little and I was scrambling for Halloween dinner ideas. It is fun without being fussy, delicious without being complicated, and spooky without being scary. The first time I made it—after that happy accident with the burnt meatloaf—my kids asked if we could have it every night in October. We compromised on once a week, and honestly? I look forward to it as much as they do.
What I love most about this recipe is how it brings people together. There is something about a meatloaf that looks like a mummy that makes everyone at the table smile. Even my grumpy teenager cracks a smile when he sees those olive eyes staring back at him. It is a reminder that food does not have to be fancy to be special—it just has to be made with a little love and a little imagination.
I would love to hear how your mummy meatloaf turns out! Did your kids love it? Did you try one of the variations? Did you come up with your own spooky twist? Drop a comment below and let me know. And if you are looking for more Halloween fun, do not miss our Best Spiderweb Sugar Cookies for Halloween—they are the perfect sweet ending to this spooky meal. Happy Halloween, and happy cooking!
Frequently Asked Questions
Can I make this mummy meatloaf ahead of time?
Absolutely! You can prepare the meatloaf mixture and shape the mummies up to 24 hours in advance. Just cover the baking sheet with plastic wrap and refrigerate. Add the dough bandages and egg wash right before baking. If you are really short on time, you can bake the meatloaves completely, cool them, and reheat them at 300°F (150°C) for 10-15 minutes before serving.
Can I use a different type of dough for the bandages?
Yes! Puff pastry and crescent roll dough are the most common options, but you can also use refrigerated pizza dough, biscuit dough (rolled thin), or even wonton wrappers for a lighter, crispier texture. Just keep in mind that different doughs will have different bake times and textures. Pizza dough will be chewier, while wonton wrappers will be very crispy.
How do I keep the dough from getting soggy?
The key is to make sure your meatloaf mixture is not too wet. If you are using a very lean meat like turkey, do not add extra liquid beyond what the recipe calls for. Also, make sure your dough strips are not overlapping too much—leave those gaps so moisture can escape during baking. If you are really worried about sogginess, you can pre-bake the meatloaves for 10 minutes before adding the dough bandages.
Can I make this recipe in a loaf pan instead?
You can, but it will not look as mummy-like. A loaf pan will give you a more traditional meatloaf shape, and the dough bandages will not wrap around as evenly. If you prefer using a loaf pan, I recommend making one large mummy instead of two small ones. Just increase the bake time to 45-50 minutes and check the internal temperature before serving.
What can I use instead of olives for the eyes?
If your kids do not like olives (or you just want a different look), you can use small rounds of cucumber, zucchini, or even carrot slices. For a sweeter option, use candy eyes (add them after baking so they do not melt). My kids also love when I use small dollops of sour cream with a tiny dot of black sesame seed in the center—it looks like cartoon eyes and is totally edible.
Pin This Recipe!
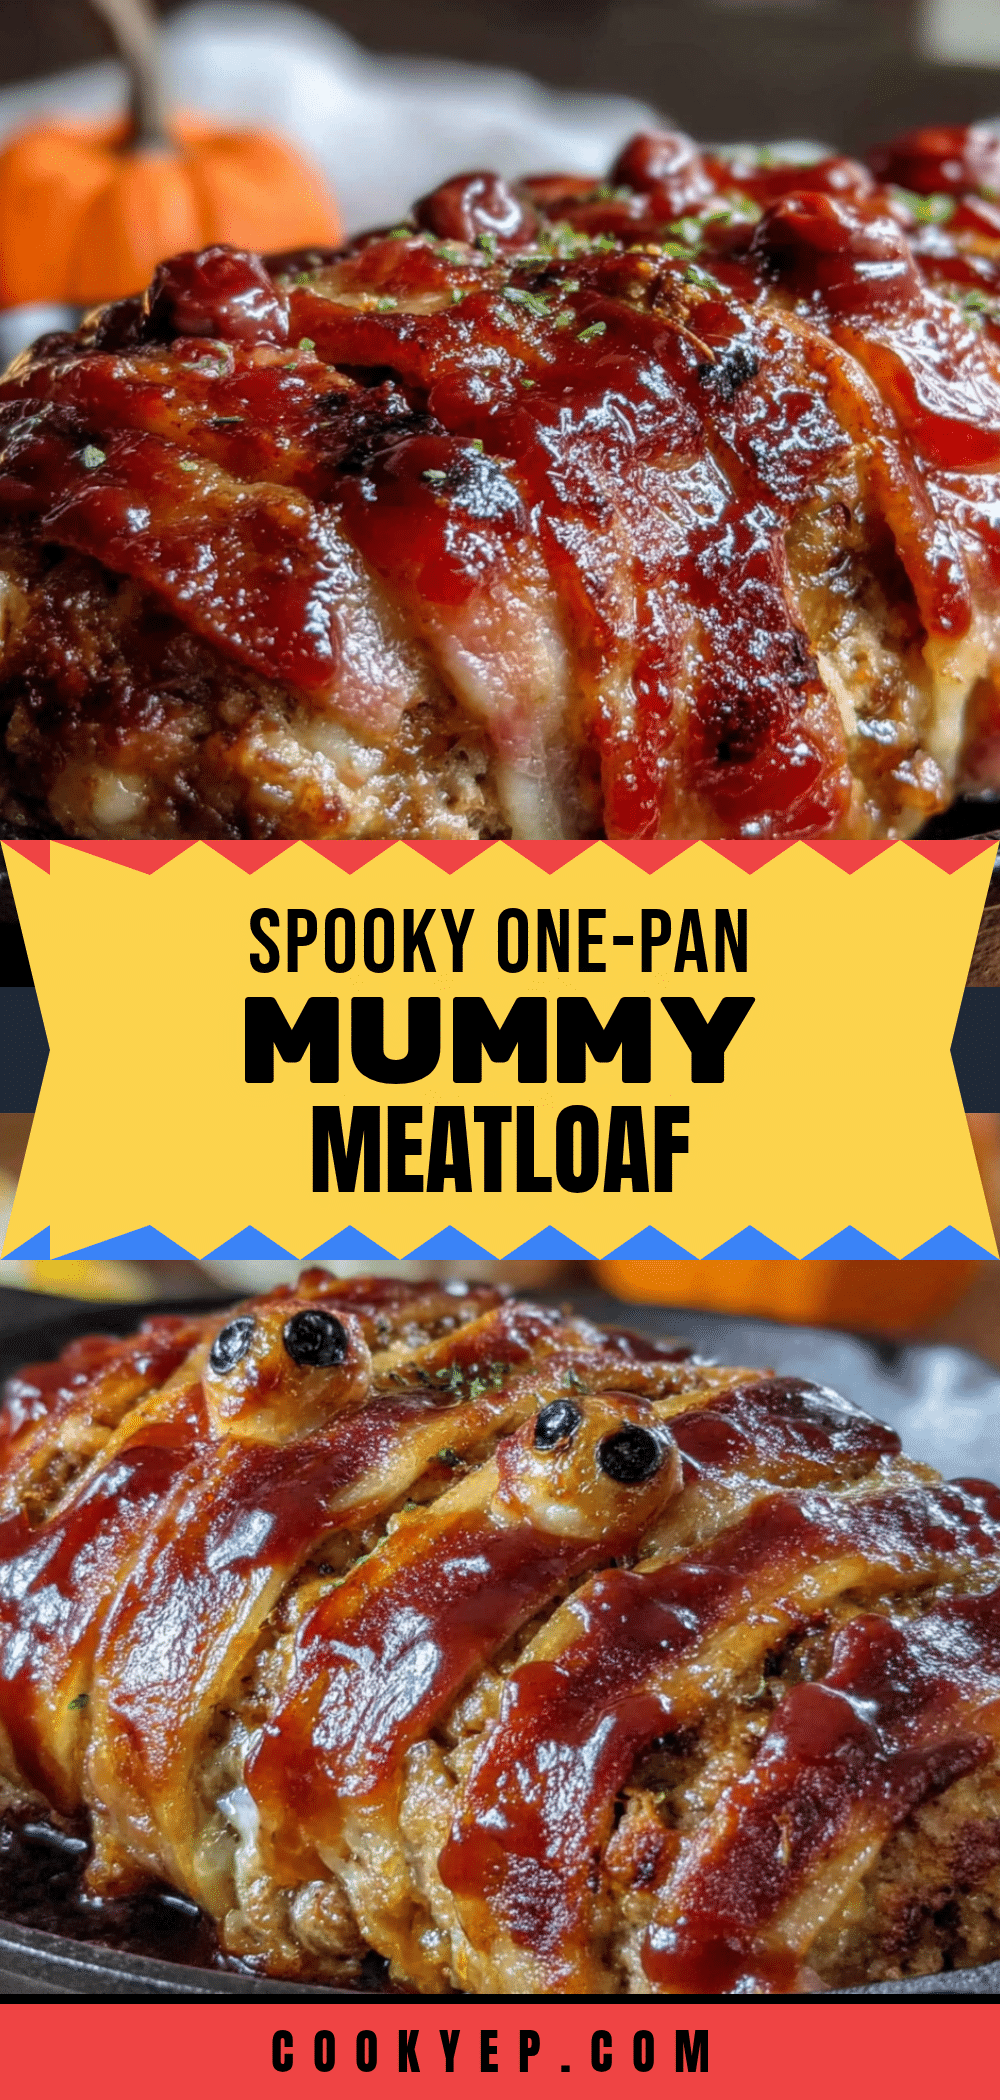
Easy Spooky Mummy Meatloaf: Best One-Pan Dinner
A fun, kid-friendly Halloween dinner that looks like a mummy but tastes like a cozy weeknight hug. This one-pan wonder combines juicy meatloaf with crispy dough bandages for a spooky meal that’s easy to make and clean up.
- Prep Time: 15 minutes
- Cook Time: 35 minutes
- Total Time: 50 minutes
- Yield: 6 servings 1x
- Category: Main Course
- Cuisine: American
Ingredients
- 1.5 lbs (680g) ground beef (80/20 recommended)
- 1 cup (120g) breadcrumbs (plain or Italian-style)
- 1/4 cup (60ml) milk (whole milk or any milk)
- 2 large eggs
- 1/2 cup (75g) yellow onion, finely diced
- 2 cloves garlic, minced
- 2 tablespoons (30ml) Worcestershire sauce
- 3 tablespoons (45ml) ketchup
- 1 teaspoon salt
- 1/2 teaspoon black pepper
- 1 teaspoon dried parsley (optional)
- 1 sheet puff pastry, thawed (or 1 can crescent roll dough, 8 oz/226g)
- 1 egg + 1 tablespoon water (for egg wash)
- 4–6 pitted black olives, sliced into rounds
- Ketchup or BBQ sauce (for serving, optional)
Instructions
- Preheat oven to 375°F (190°C). Line a large rimmed baking sheet with parchment paper or foil.
- In a large bowl, combine ground beef, breadcrumbs, milk, eggs, onion, garlic, Worcestershire sauce, ketchup, salt, pepper, and parsley. Mix gently with your hands until just combined; do not overmix.
- Divide mixture into two equal portions. On the prepared baking sheet, shape each into a log about 6 inches (15 cm) long and 2.5 inches (6 cm) wide, with rounded ends. Leave at least 3 inches (7.5 cm) between them.
- If using puff pastry, lightly flour a work surface and roll the sheet to about 1/8-inch (3 mm) thickness. If using crescent roll dough, unroll and press perforations to seal. Cut dough into strips about 1/2-inch (1.25 cm) wide and 6-8 inches (15-20 cm) long.
- Starting at one end of a meatloaf, drape dough strips across the top, angling slightly and leaving about 1/2-inch (1.25 cm) gaps between strips. Overlap edges slightly. Leave a small area at one end uncovered for the face. Repeat with second meatloaf. Tuck ends under the meatloaves.
- In a small bowl, beat 1 egg with 1 tablespoon water. Brush egg wash over all exposed dough strips.
- Bake for 30-35 minutes, until internal temperature reaches 160°F (71°C) and dough is golden brown. If dough browns too quickly, tent with foil after 20 minutes.
- Remove from oven and let rest 5 minutes. Press two olive slices into the uncovered face area of each meatloaf to create eyes.
- Serve warm with ketchup or BBQ sauce for dipping.
Notes
Do not overmix the meatloaf to keep it tender. Keep dough cold for best puffing. Leave gaps between bandages for the mummy look. Let meatloaf rest 5 minutes before slicing. For gluten-free, use gluten-free breadcrumbs and puff pastry. For dairy-free, use almond milk and skip egg wash. Leftovers keep in the fridge for up to 4 days or freeze for up to 3 months.
Nutrition
- Serving Size: 1 serving (1/6 of re
- Calories: 420
- Sugar: 6
- Sodium: 680
- Fat: 24
- Saturated Fat: 8
- Carbohydrates: 22
- Fiber: 1
- Protein: 28
Keywords: Halloween dinner, mummy meatloaf, kid-friendly, one-pan meal, spooky dinner, easy meatloaf, Halloween recipe


